Rust 知识碎片
编译过程
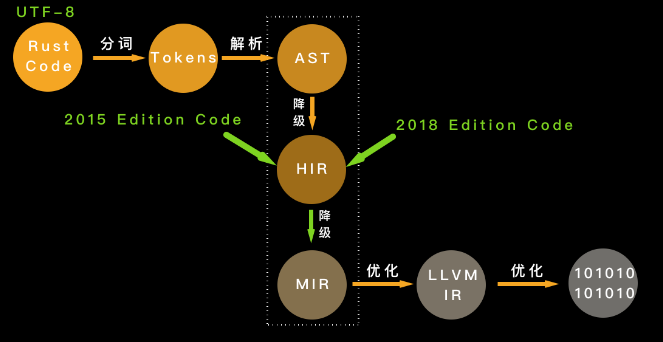
- 分词:把词法结构处理成词条流
- 词条流经过语法解析形成抽象语法树
- 抽象语法树简化成高级中间语言 (HIR),编译器对 HIR 进行类型检查、方法查找等工作
- HIR 进一步简化形成中级中间语言 (MIR),编译器对 MIR 进行借用检查、优化等工作,在 MIR 中已经看不到 Rust 各版次(Edition)的差异了
- 产生 LLVM 中间语言
- LLVM 后端会对 LLVM 中间语言进行优化,最终生成机器代码
常用数据结构
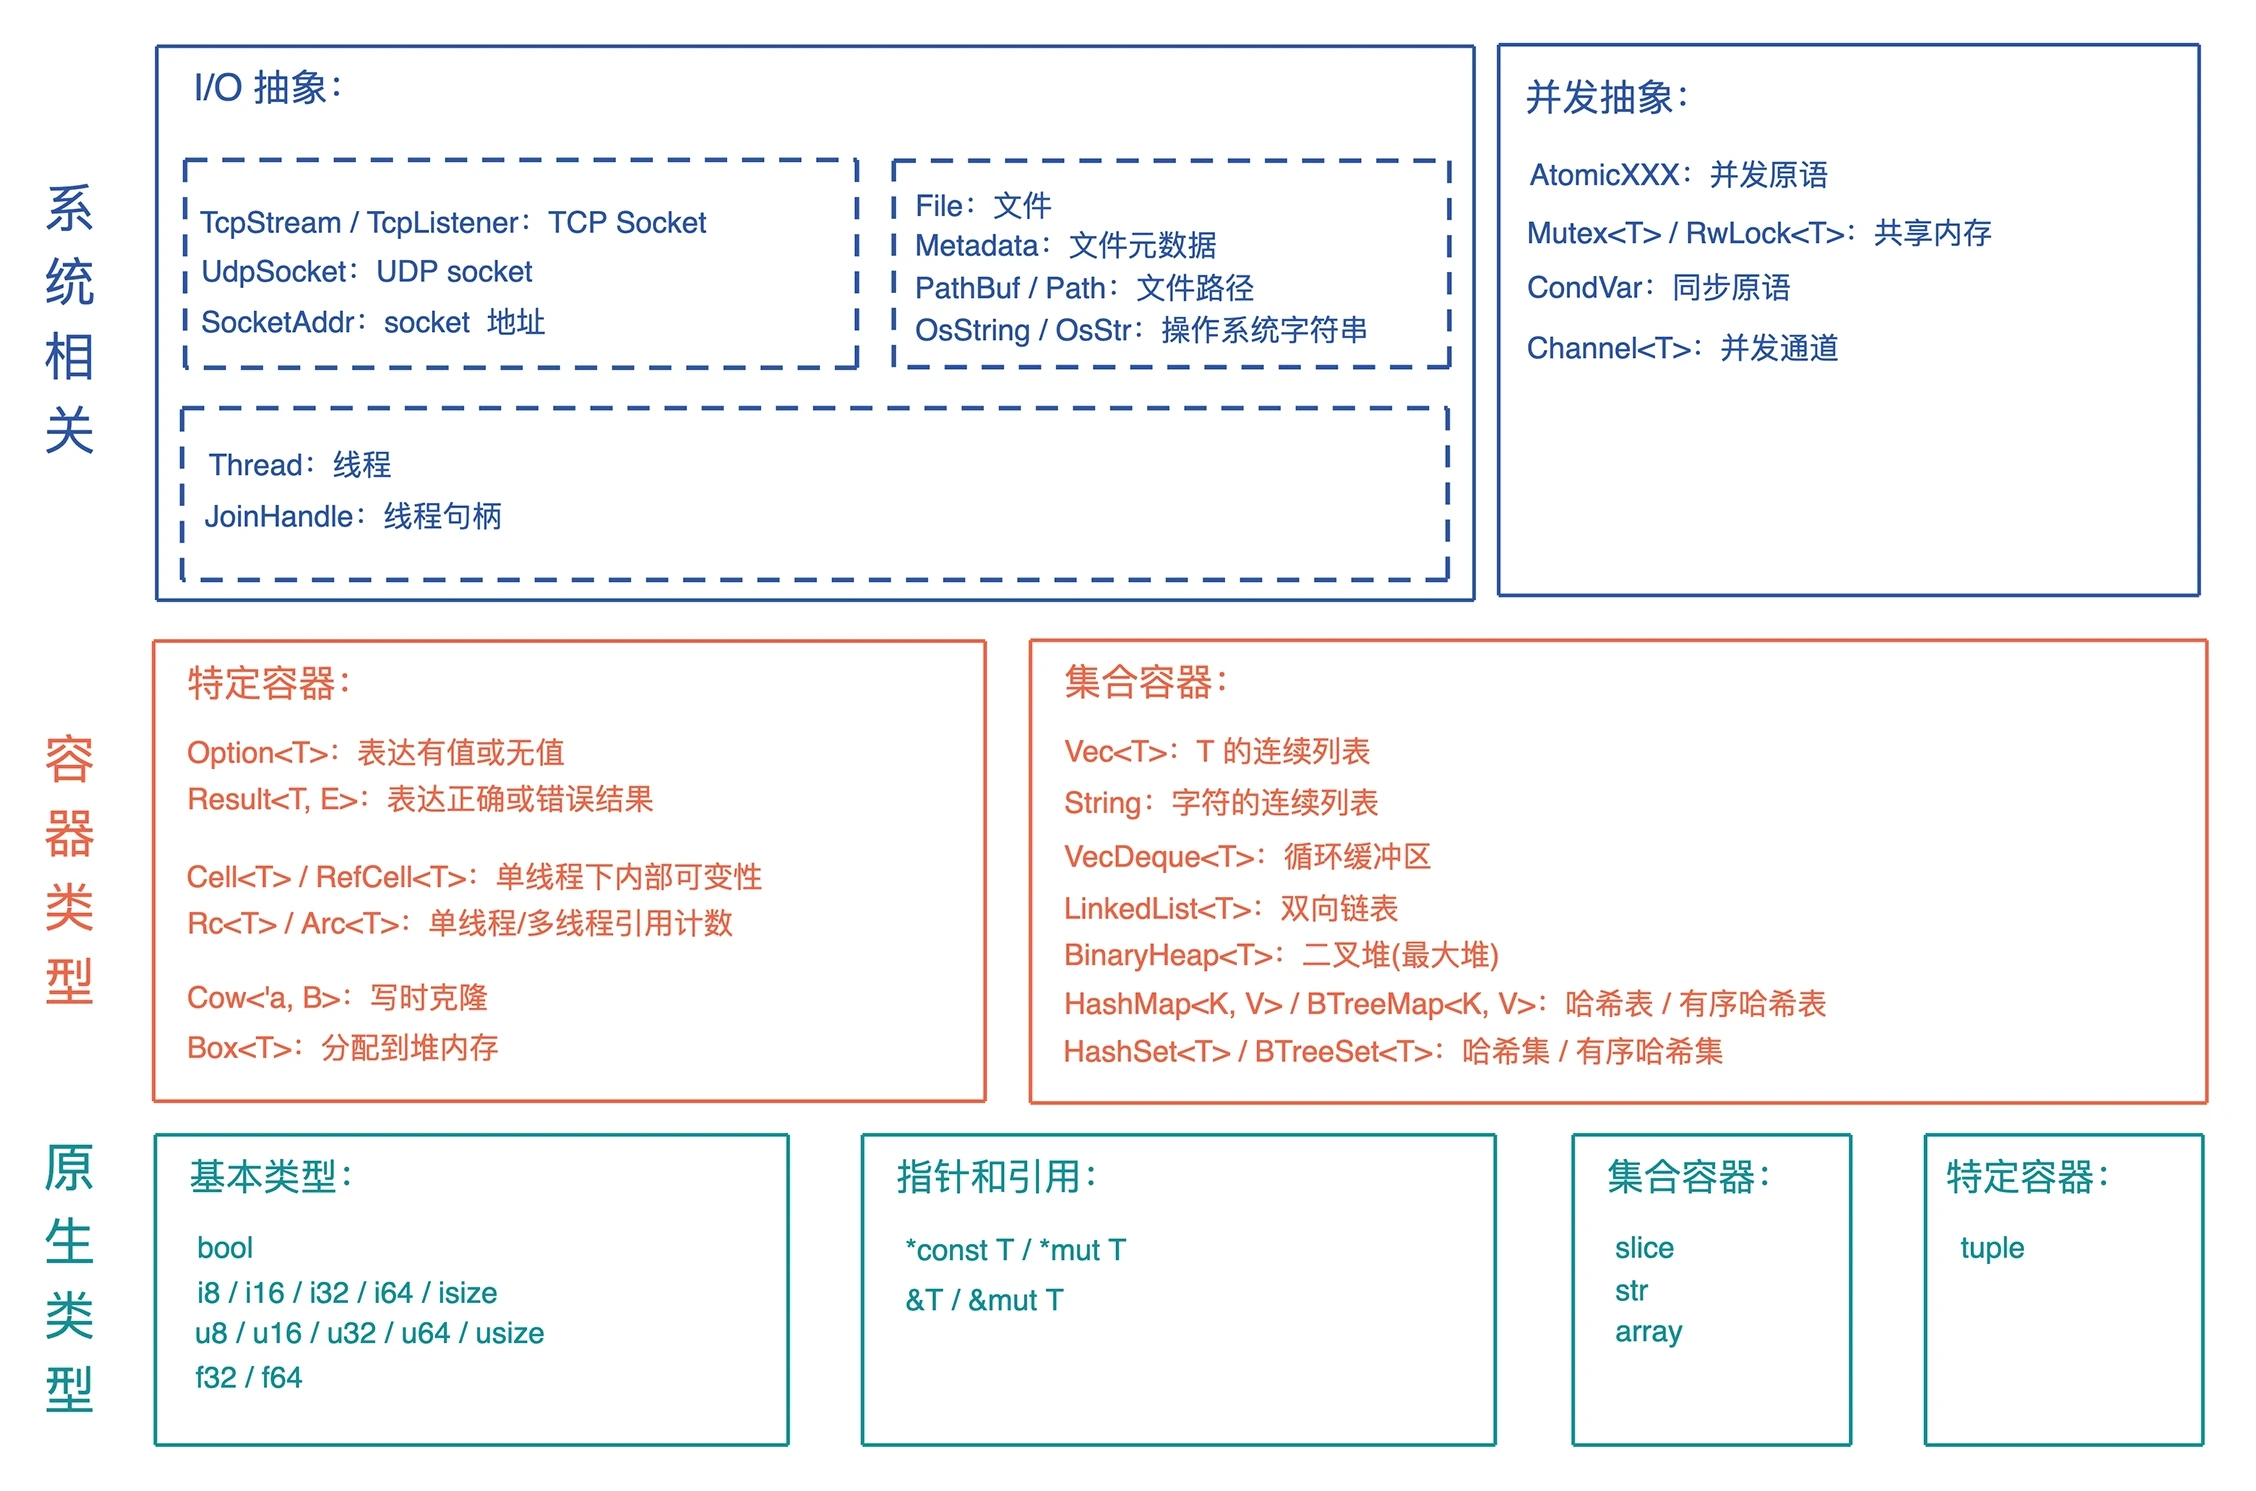
值放堆上还是栈上
#![allow(unused)]
fn main() {
let s = "hello world".to_string();
println!("'hello world': {:p}, s: {:p}, len: {}, capacity: {}, size: {}",
        &"hello world", &s, s.len(), s.capacity(), std::mem::size_of_val(&s));
}
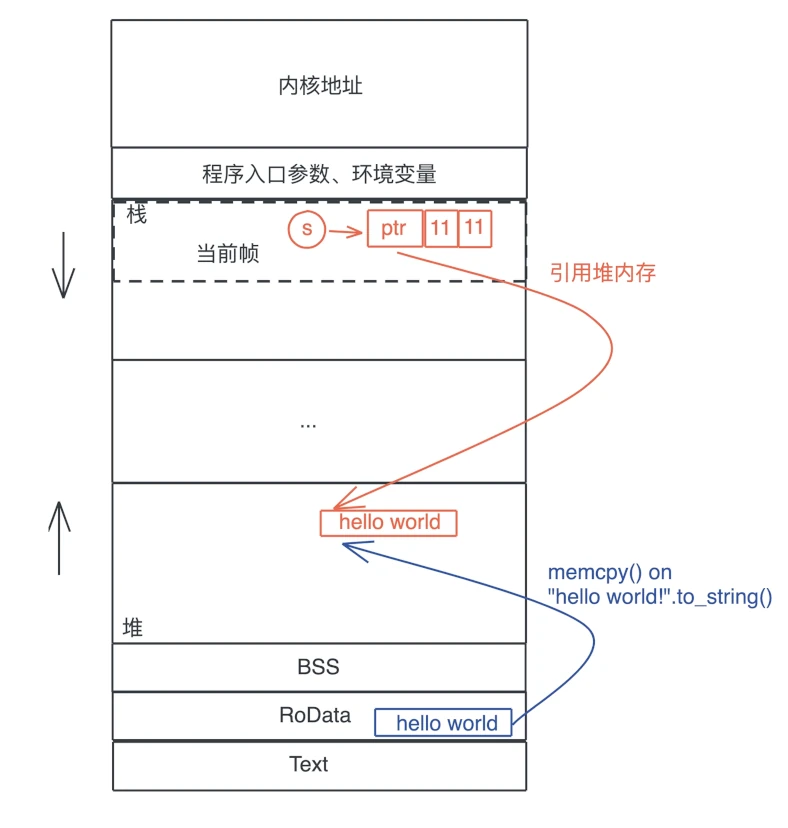
栈上存放的数据是静态的,固定大小,固定生命周期;堆上存放的数据是动态的,不固定大小,不固定生命周期。
#![allow(unused)]
fn main() {
static MAX: u32 = 0;
fn foo() {}
let hello = "hello world".to_string();
let data = Box::new(1);

// string literals 指向 RODATA 地址
println!("RODATA: {:p}", "hello world!");
// static 变量在 DATA section
println!("DATA (static var): {:p}", &MAX);
// function 在 TEXT
println!("TEXT (function): {:p}", foo as *const ());
// String 结构体分配在栈上,所以其引用指向一个栈地址
println!("STACK (&hello): {:p}", &hello);
// 需要通过解引用获取其堆上数据,然后取其引用
println!("HEAP (&*hello): {:p}", &*hello);
// Box 实现了 Pointer trait 无需额外解引用
println!("HEAP (box impl Pointer) {:p} {:p}", data, &*data);
}
move, copy, borrow
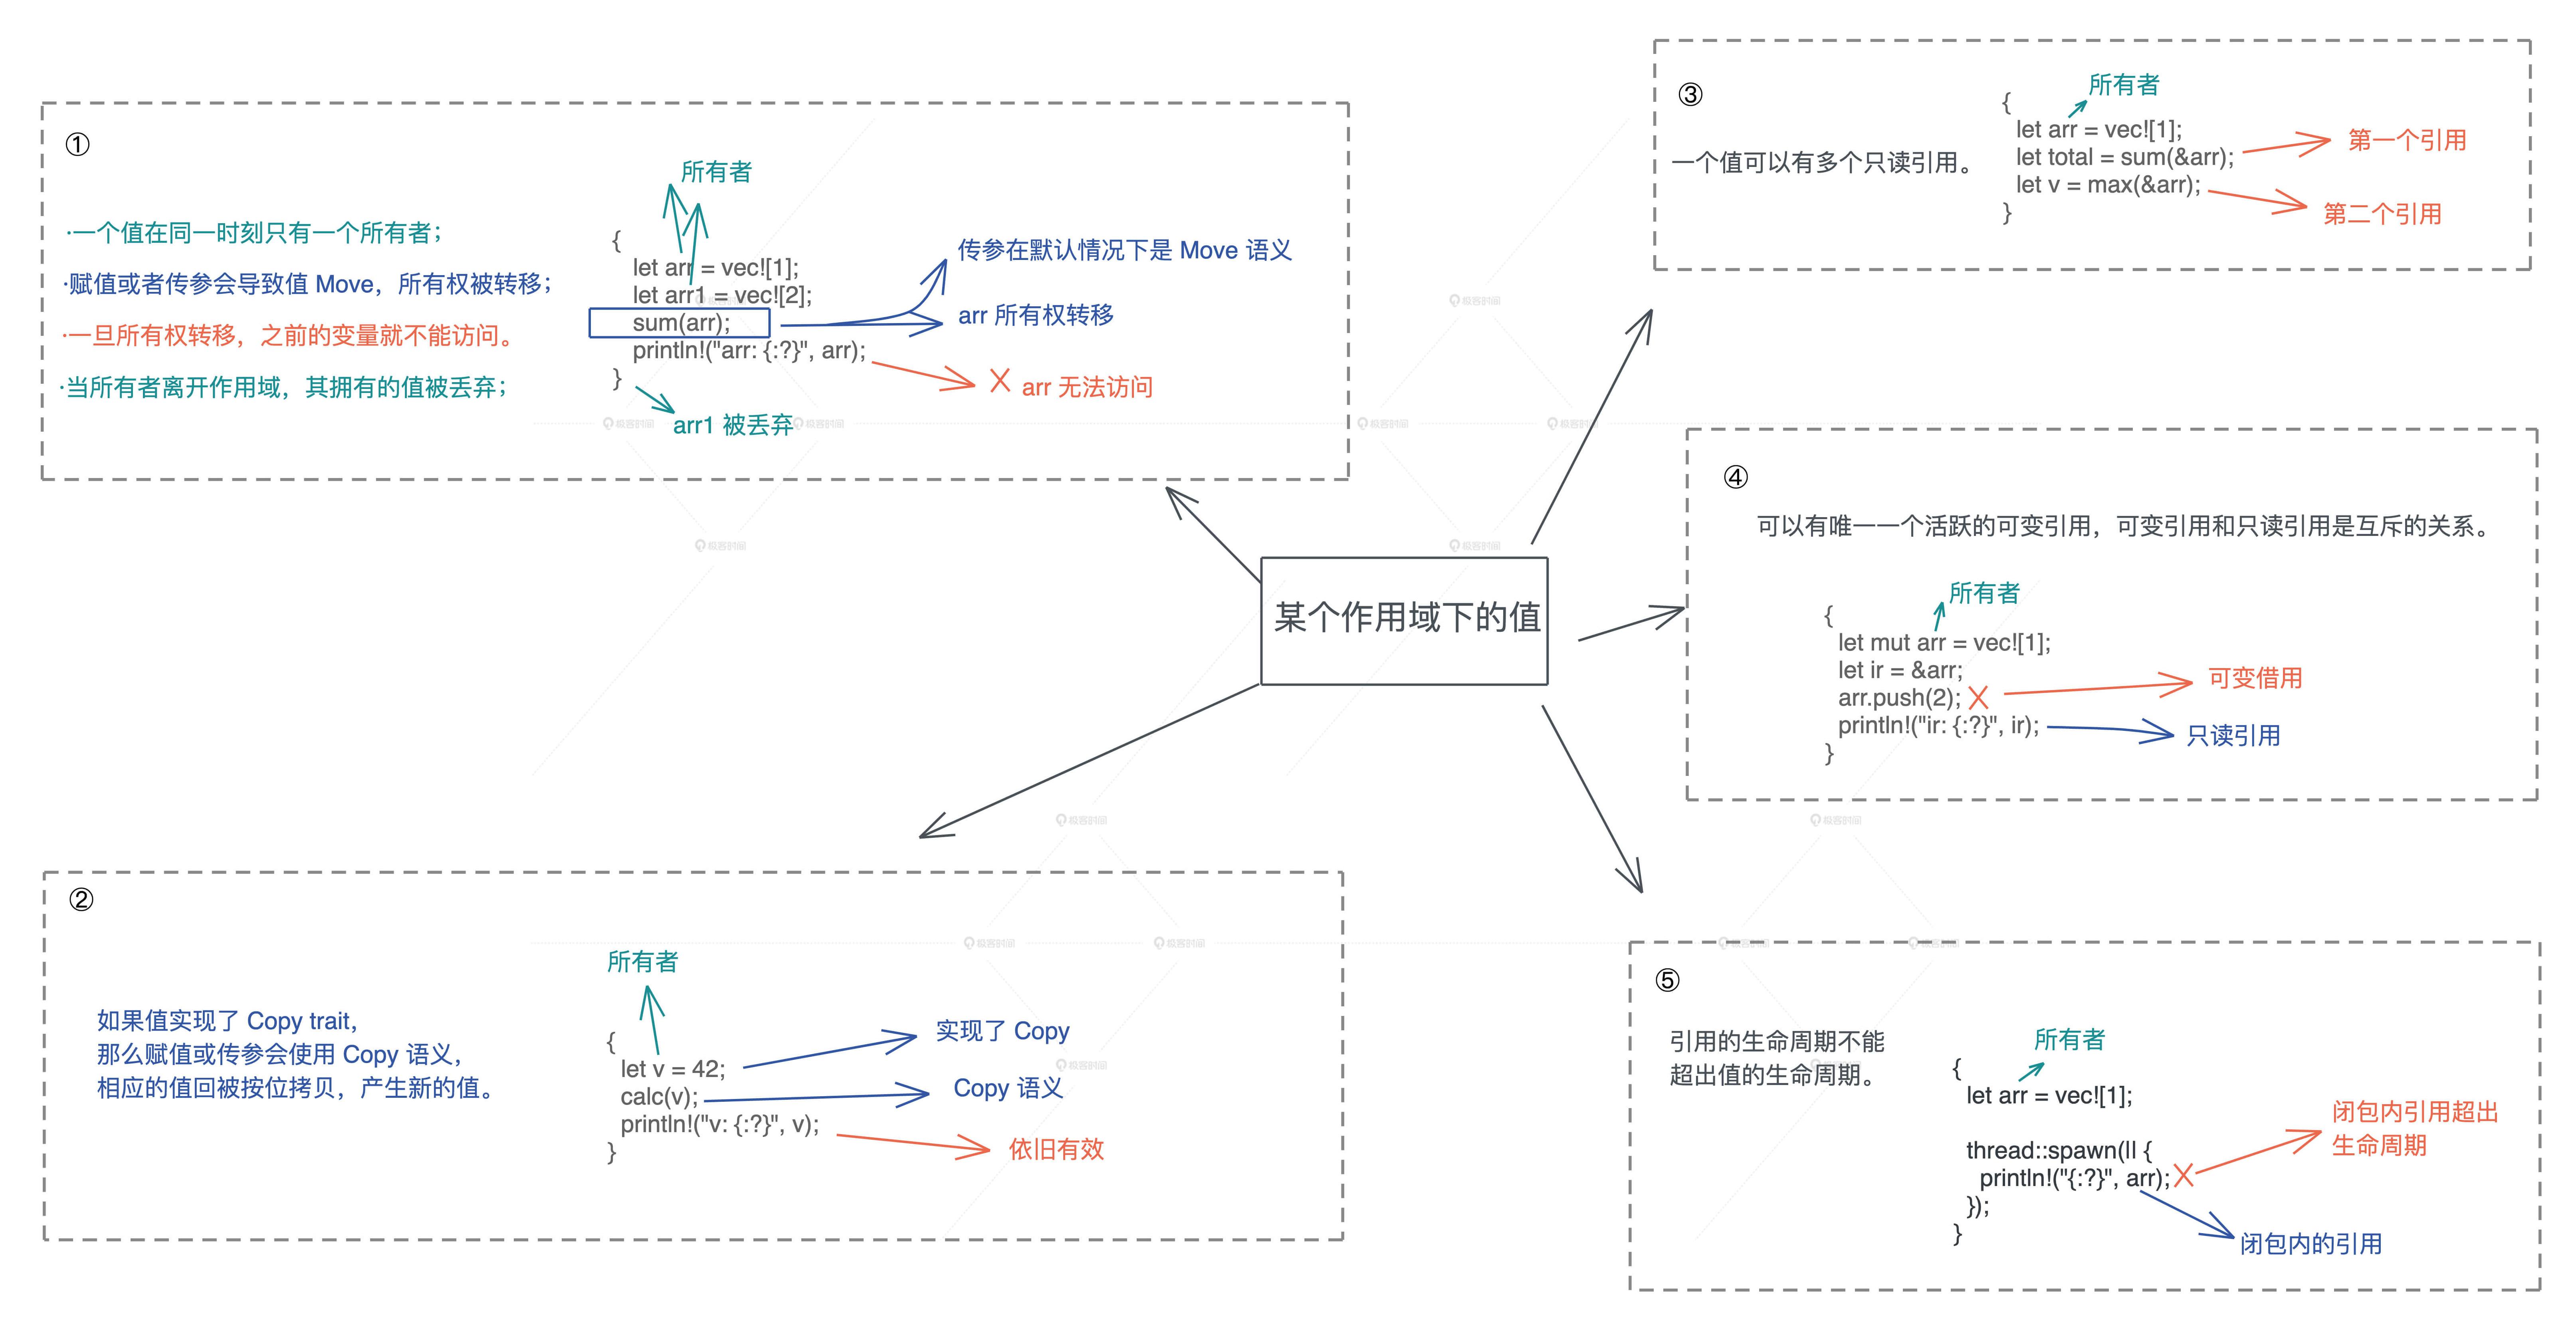
其实 Copy 和 Move 在内部实现上,都是浅层的按位做内存复制,只不过 Copy 允许你访问之前的变量,而 Move 不允许。
关于内存复制上的误区
如果代码的关键路径中的每次都要复制几百 k 的数据(比如一个大数组),这是很低效的。但是,如果要复制的只是原生类型(Copy)或者栈上的胖指针(Move),不涉及堆内存的复制(即没有做深拷贝(deep copy)),那这个效率是非常高的,不必担心每次赋值或者每次传参带来的性能损失。
Rust 的集合类型会在使用过程中自动扩展。以一个 Vec 为例,当使用完堆内存当前容量后,还继续添加新的内容,就会触发堆内存的自动增长。有时候,集合类型里的数据不断进进出出,导致集合一直增长,但实际只使用了很小部分的容量,导致内存的使用效率很低,这时可以考虑使用 shrink_to_fit 方法来节约对内存的使用。
所有权
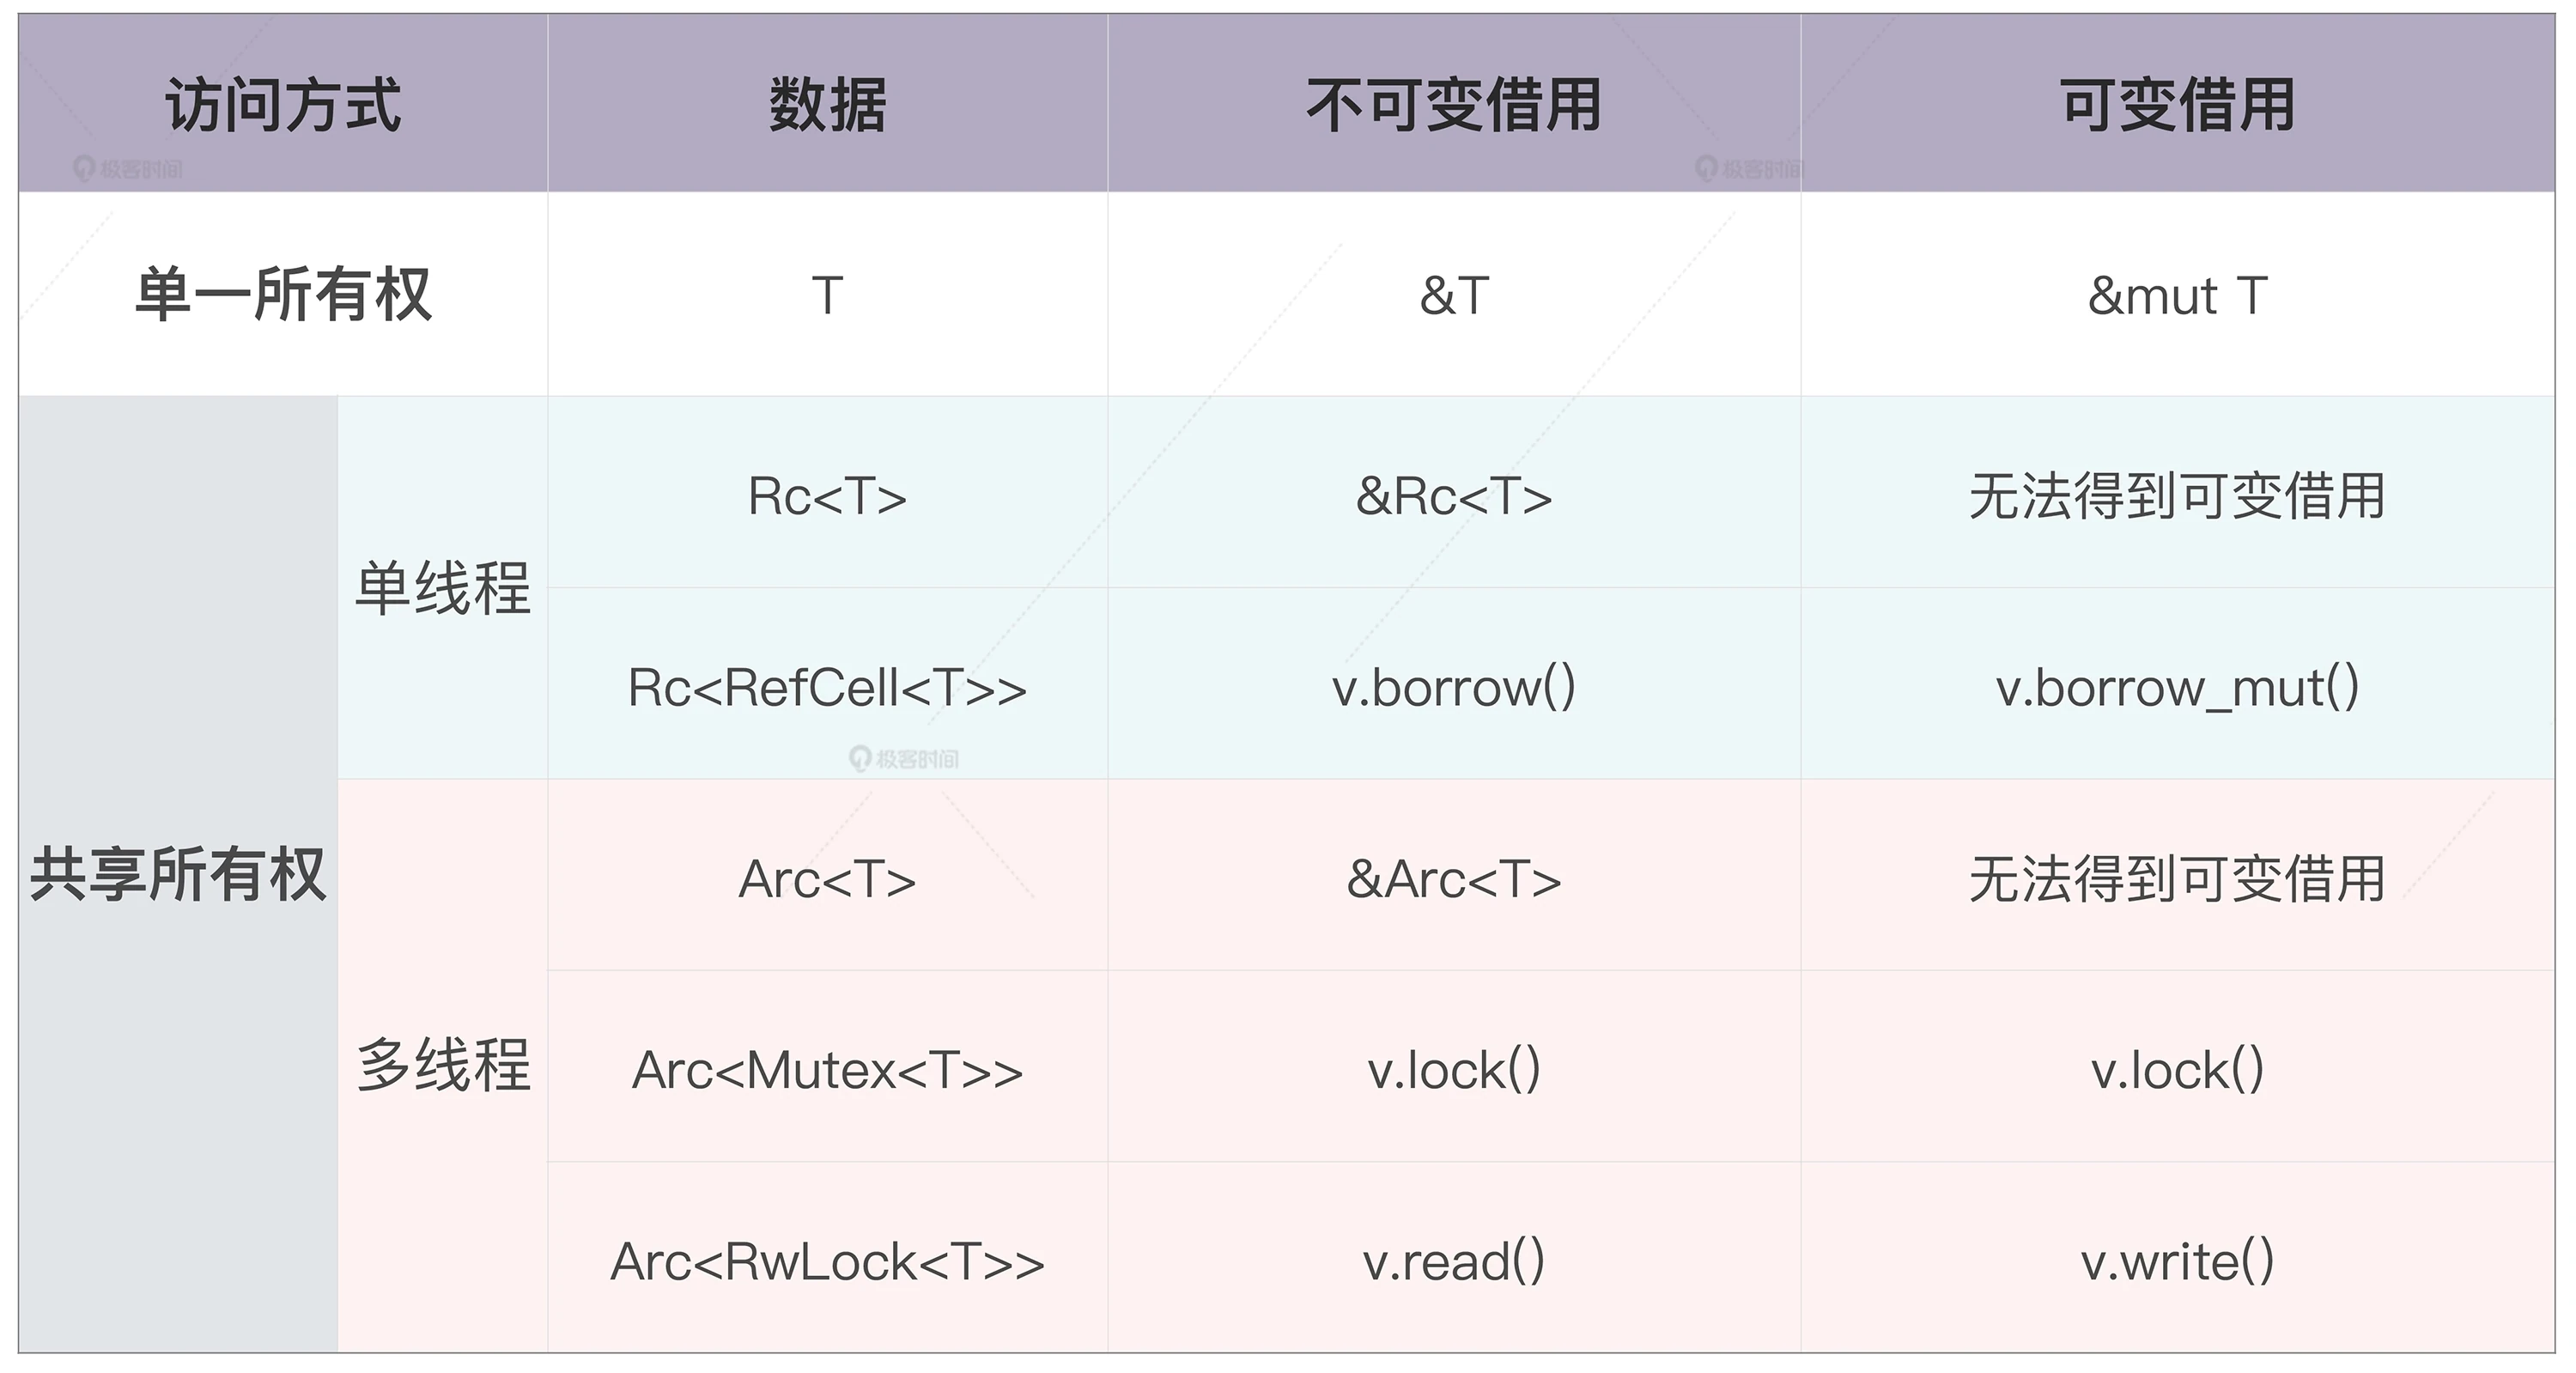
所有权的静态检查和动态检查
在所有权模型下,堆内存的生命周期,和创建它的栈内存的生命周期保持一致。编译器可以保证代码符合所有权规则(静态检查)。
动态检查,通过 Box::leak() 让堆内存拥有不受限制的生命周期,然后在运行过程中,通过对引用计数的检查,保证这样的堆内存最终会得到释放。
外部可变性与内部可变性
| 使用方法 | 所有权检查 | |
|---|---|---|
| 外部可变性 | let mut 或者 &mut | 编译时,如果不符合规则,产生编译错误 |
| 内部可变性 | 使用 Cell/RefCell | 运行时,如果不符合规则,产生 panic |
use std::cell::RefCell;

fn main() {
    let data = RefCell::new(1);
    // 根据所有权规则,在同一个作用域下,不能同时有活跃的可变借用和不可变借用
    // 通过这对花括号,我们缩小了可变借用的生命周期
    {
        // 获得 RefCell 内部数据的可变借用
        let mut v = data.borrow_mut();
        *v += 1;
    }
    println!("data: {:?}", data.borrow());
}
生命周期
pub fn strtok<'a>(s: &mut &'a str, delimiter: char) -> &'a str {
    if let Some(i) = s.find(delimiter) {
        let prefix = &s[..i];
        // 由于 delimiter 可以是 utf8,所以我们需要获得其 utf8 长度,
        // 直接使用 len 返回的是字节长度,会有问题
        let suffix = &s[(i + delimiter.len_utf8())..];
        *s = suffix;
        prefix
    } else {
        // 如果没找到,返回整个字符串,把原字符串指针 s 指向空串
        let prefix = *s;
        *s = "";
        prefix
    }
}

fn main() {
    let s = String::from("hello world");
    let mut s1 = s.as_str();
    let hello = strtok(&mut s1, ' ');
    println!("hello is: {}, s1: {}, s: {}", hello, s1, s);
}
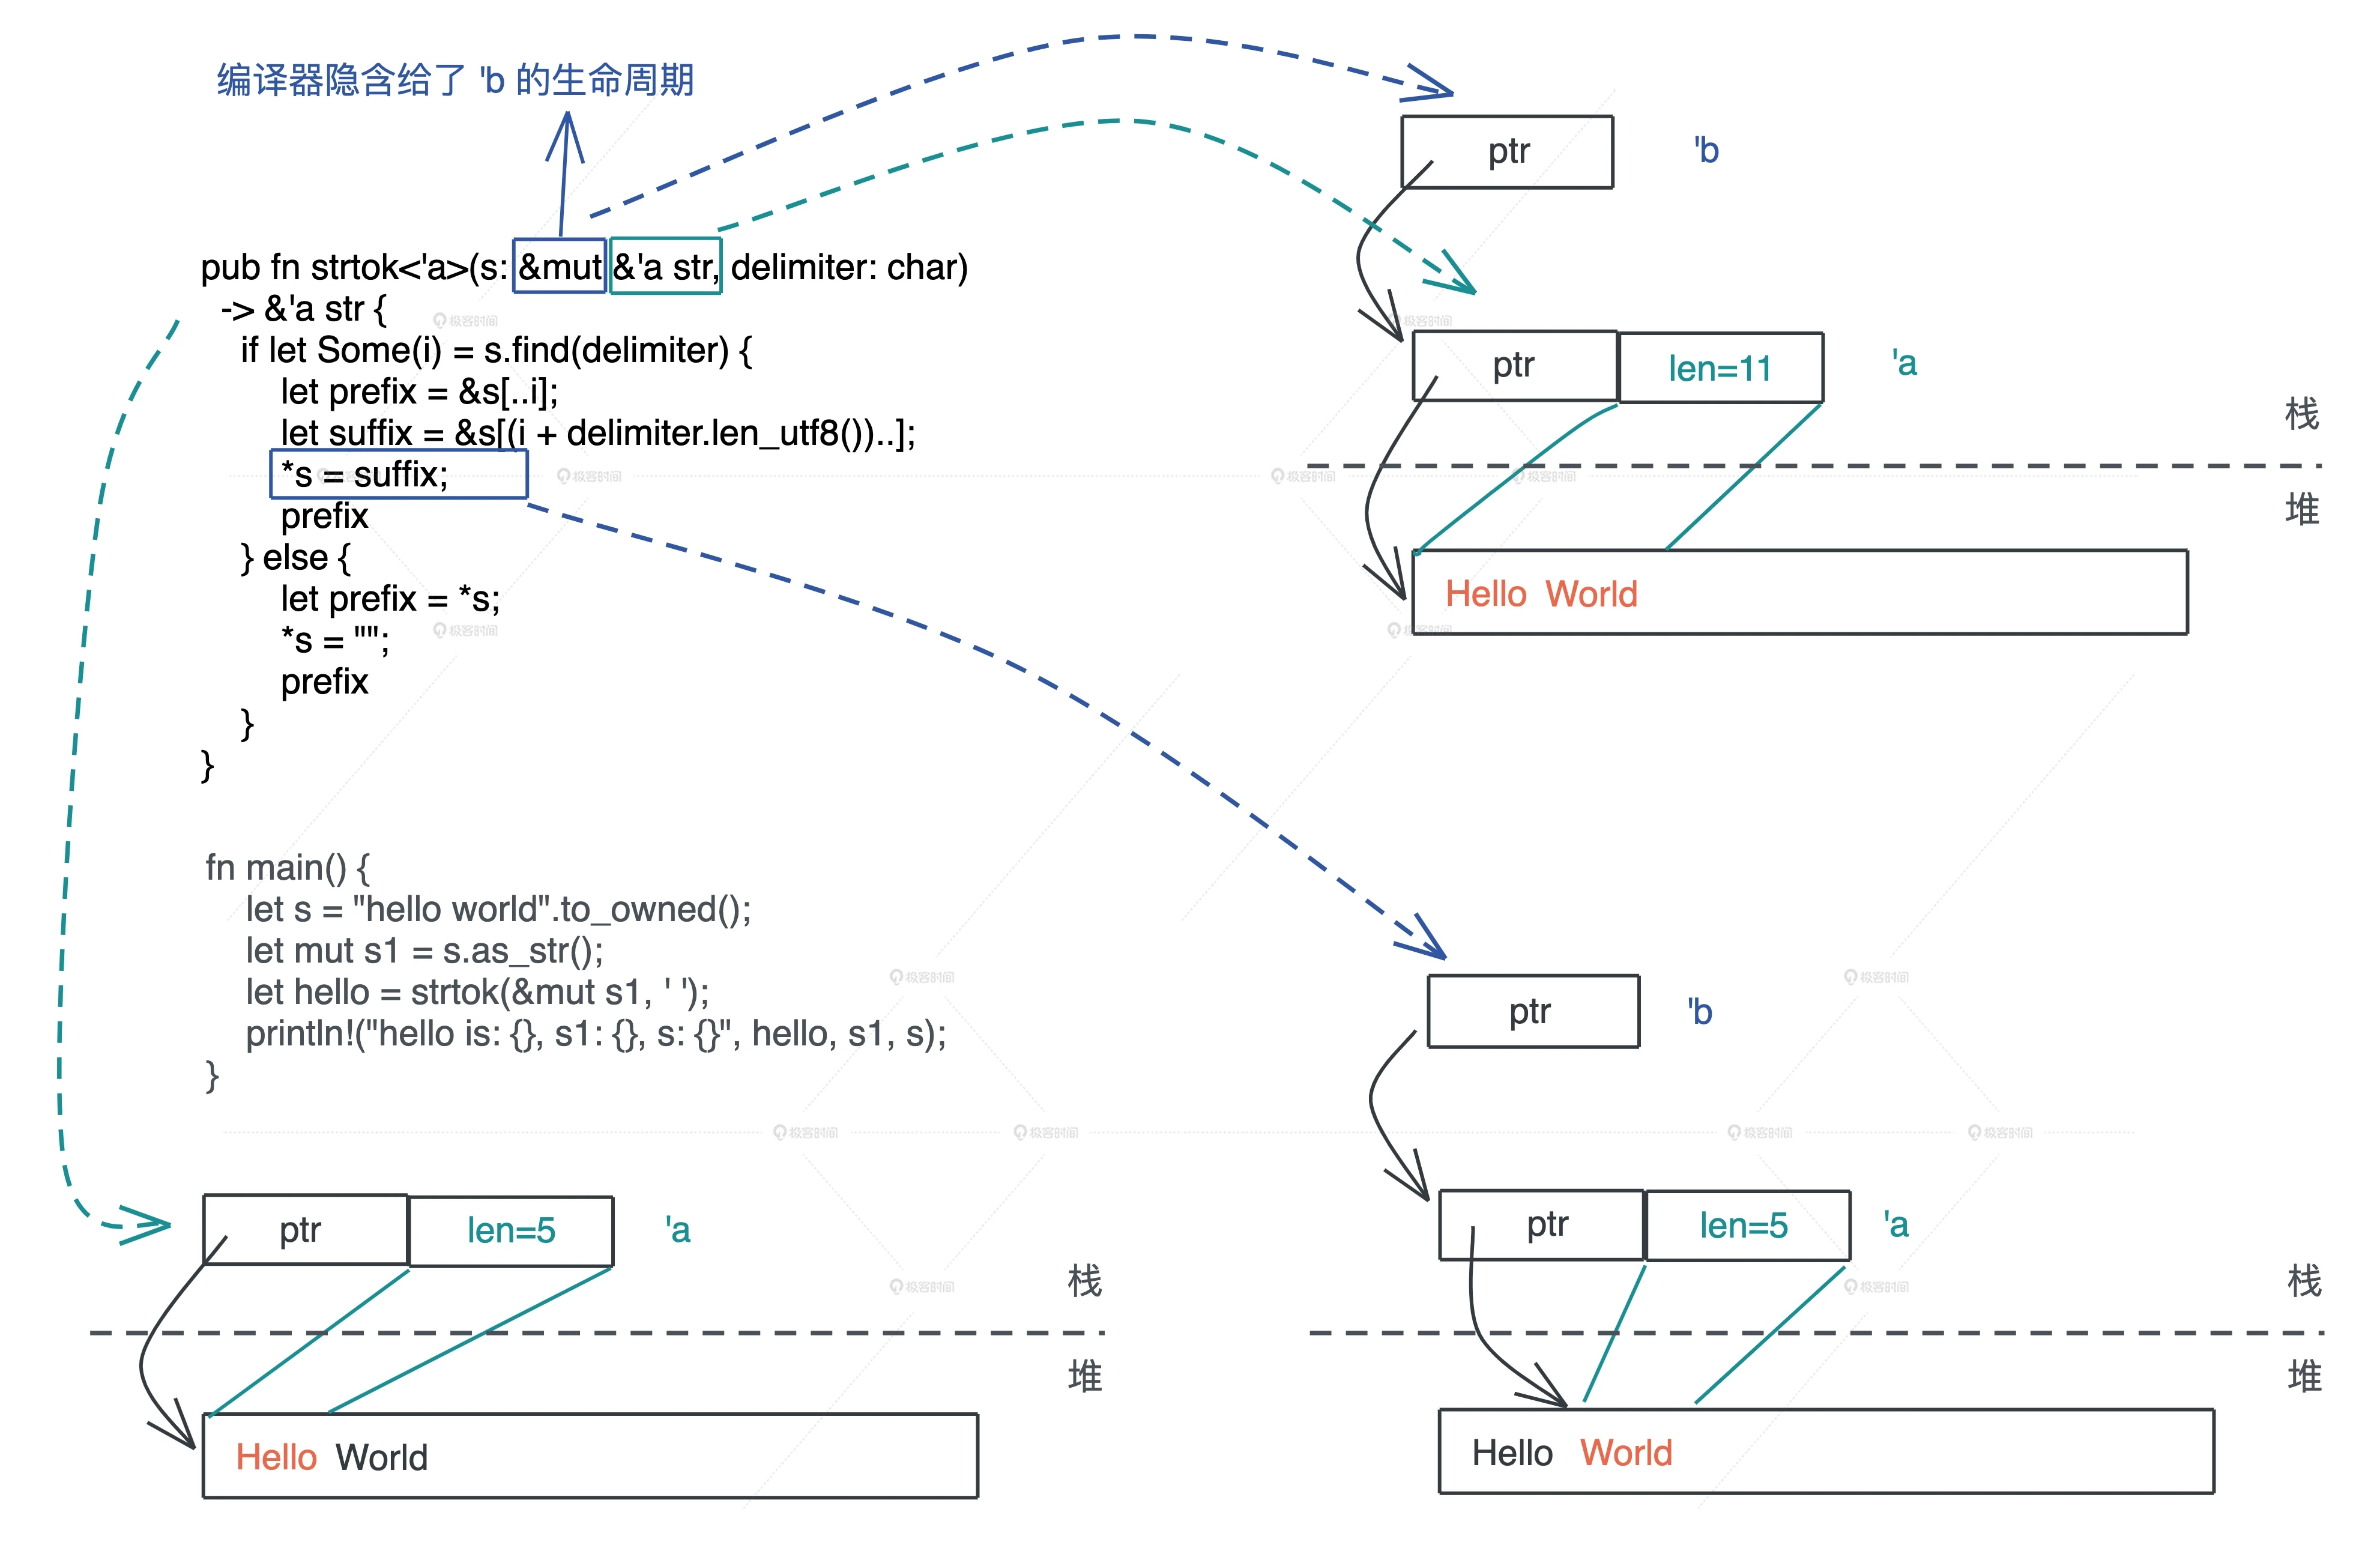
注意:当你要返回在函数执行过程中,创建的或者得到的数据,和参数无关,那么无论它是一个有所有权的数据,还是一个引用,你只能返回带所有权的数据。对于引用,这就意味着调用
clone()或者to_owned()来从引用中得到所有权。
结构体成员自动重排
use std::mem::{align_of, size_of};

struct S1 {
    a: u8,
    b: u16,
    c: u8,
}

struct S2 {
    a: u8,
    c: u8,
    b: u16,
}

#[repr(C)]
struct S3 {
    a: u8,
    b: u16,
    c: u8,
}

fn main() {
    println!(
        "sizeof S1: {}, S2: {}, S3: {}",
        size_of::<S1>(),
        size_of::<S2>(),
        size_of::<S3>()
    );
    println!(
        "alignof S1: {}, S2: {}, S3: {}",
        align_of::<S1>(),
        align_of::<S2>(),
        align_of::<S3>()
    );
}
Rust 编译器默会优化结构体的排列,但我们也可以使用 #[repr] 宏,强制让 Rust 编译器不做优化,和 C 的行为一致,这样,Rust 代码可以方便地和 C 代码无缝交互。
enum 的内存布局

enum 是一个标签联合体(tagged union),它的大小是标签的大小,加上最大类型的长度。所以对于 Option<u8>,其长度是 1 + 1 = 2 字节,而 Option<f64>,长度是 8 + 8 =16 字节。
use std::collections::HashMap;
use std::mem::size_of;

enum MyEnum {
    A(f64),
    B(HashMap<String, String>),
    C(Result<Vec<u8>, String>),
}

// 这是一个声明宏,它会打印各种数据结构本身的大小,在 Option 中的大小,以及在 Result 中的大小
macro_rules! show_size {
    (header) => {
        println!(
            "{:<24} {:>4}    {}    {}",
            "Type", "T", "Option<T>", "Result<T, io::Error>"
        );
        println!("{}", "-".repeat(64));
    };
    ($t:ty) => {
        println!(
            "{:<24} {:4} {:8} {:12}",
            stringify!($t),
            size_of::<$t>(),
            size_of::<Option<$t>>(),
            size_of::<Result<$t, std::io::Error>>(),
        )
    };
}

fn main() {
    show_size!(header);
    show_size!(u8);
    show_size!(f64);
    show_size!(&u8);
    show_size!(Box<u8>);
    show_size!(&[u8]);

    show_size!(String);
    show_size!(Vec<u8>);
    show_size!(HashMap<String, String>);
    show_size!(MyEnum);
}
但是 Rust 编译器会对 enum 做一些额外的优化,让某些常用结构的内存布局更紧凑。Option 配合带有引用类型的数据结构,比如 &u8、Box、Vec、HashMap ,没有额外占用空间。引用类型的第一个域是个指针,而指针是不可能等于 0 的,通过复用这个指针:当其为 0 时,表示 None,否则是 Some,减少了内存占用。
线程安全的全局变量 (lazy_static)
use lazy_static::lazy_static;
use std::collections::HashMap;
use std::sync::{Arc, Mutex};

lazy_static! {
    static ref HASHMAP: Arc<Mutex<HashMap<u32, &'static str>>> = {
        let mut m = HashMap::new();
        m.insert(0, "foo");
        m.insert(1, "bar");
        m.insert(2, "baz");
        Arc::new(Mutex::new(m))
    };
}

fn main() {
    let mut map = HASHMAP.lock().unwrap();
    map.insert(3, "waz");

    println!("map: {:?}", map);
}
带关联类型的 trait
use std::str::FromStr;

use lazy_static::lazy_static;
use regex::Regex;

pub trait ParseFromStr {
    type Error;
    fn parse_from_str(s: &str) -> Result<Self, Self::Error>
    where
        Self: Sized;
}

impl<T> ParseFromStr for T
where
    T: FromStr,
{
    // 定义关联类型 Error 为 String
    type Error = String;

    fn parse_from_str(s: &str) -> Result<Self, Self::Error> {
        // ensure that regular expressions are compiled exactly once.
        lazy_static! {
            static ref RE: Regex = Regex::new(r"^\d+(\.\d+)?").unwrap();
        };
        if let Some(captures) = RE.captures(s) {
            captures
                .get(0)
                .map_or(Err("failed to capture".to_string()), |s| {
                    s.as_str()
                        .parse()
                        .map_err(|_e| "failed to parse captured string".to_string())
                })
        } else {
            Err("failed to parse string".to_string())
        }
    }
}

fn main() {
    println!("result: {}", u8::parse_from_str("255 hello").unwrap());
    println!("result: {}", u8::parse_from_str("001 world").unwrap());
    println!("result: {}", u8::parse_from_str("!").unwrap_or_default());
    println!("result: {}", f64::parse_from_str("123.45abc").unwrap());
}
trait object 的实现机制
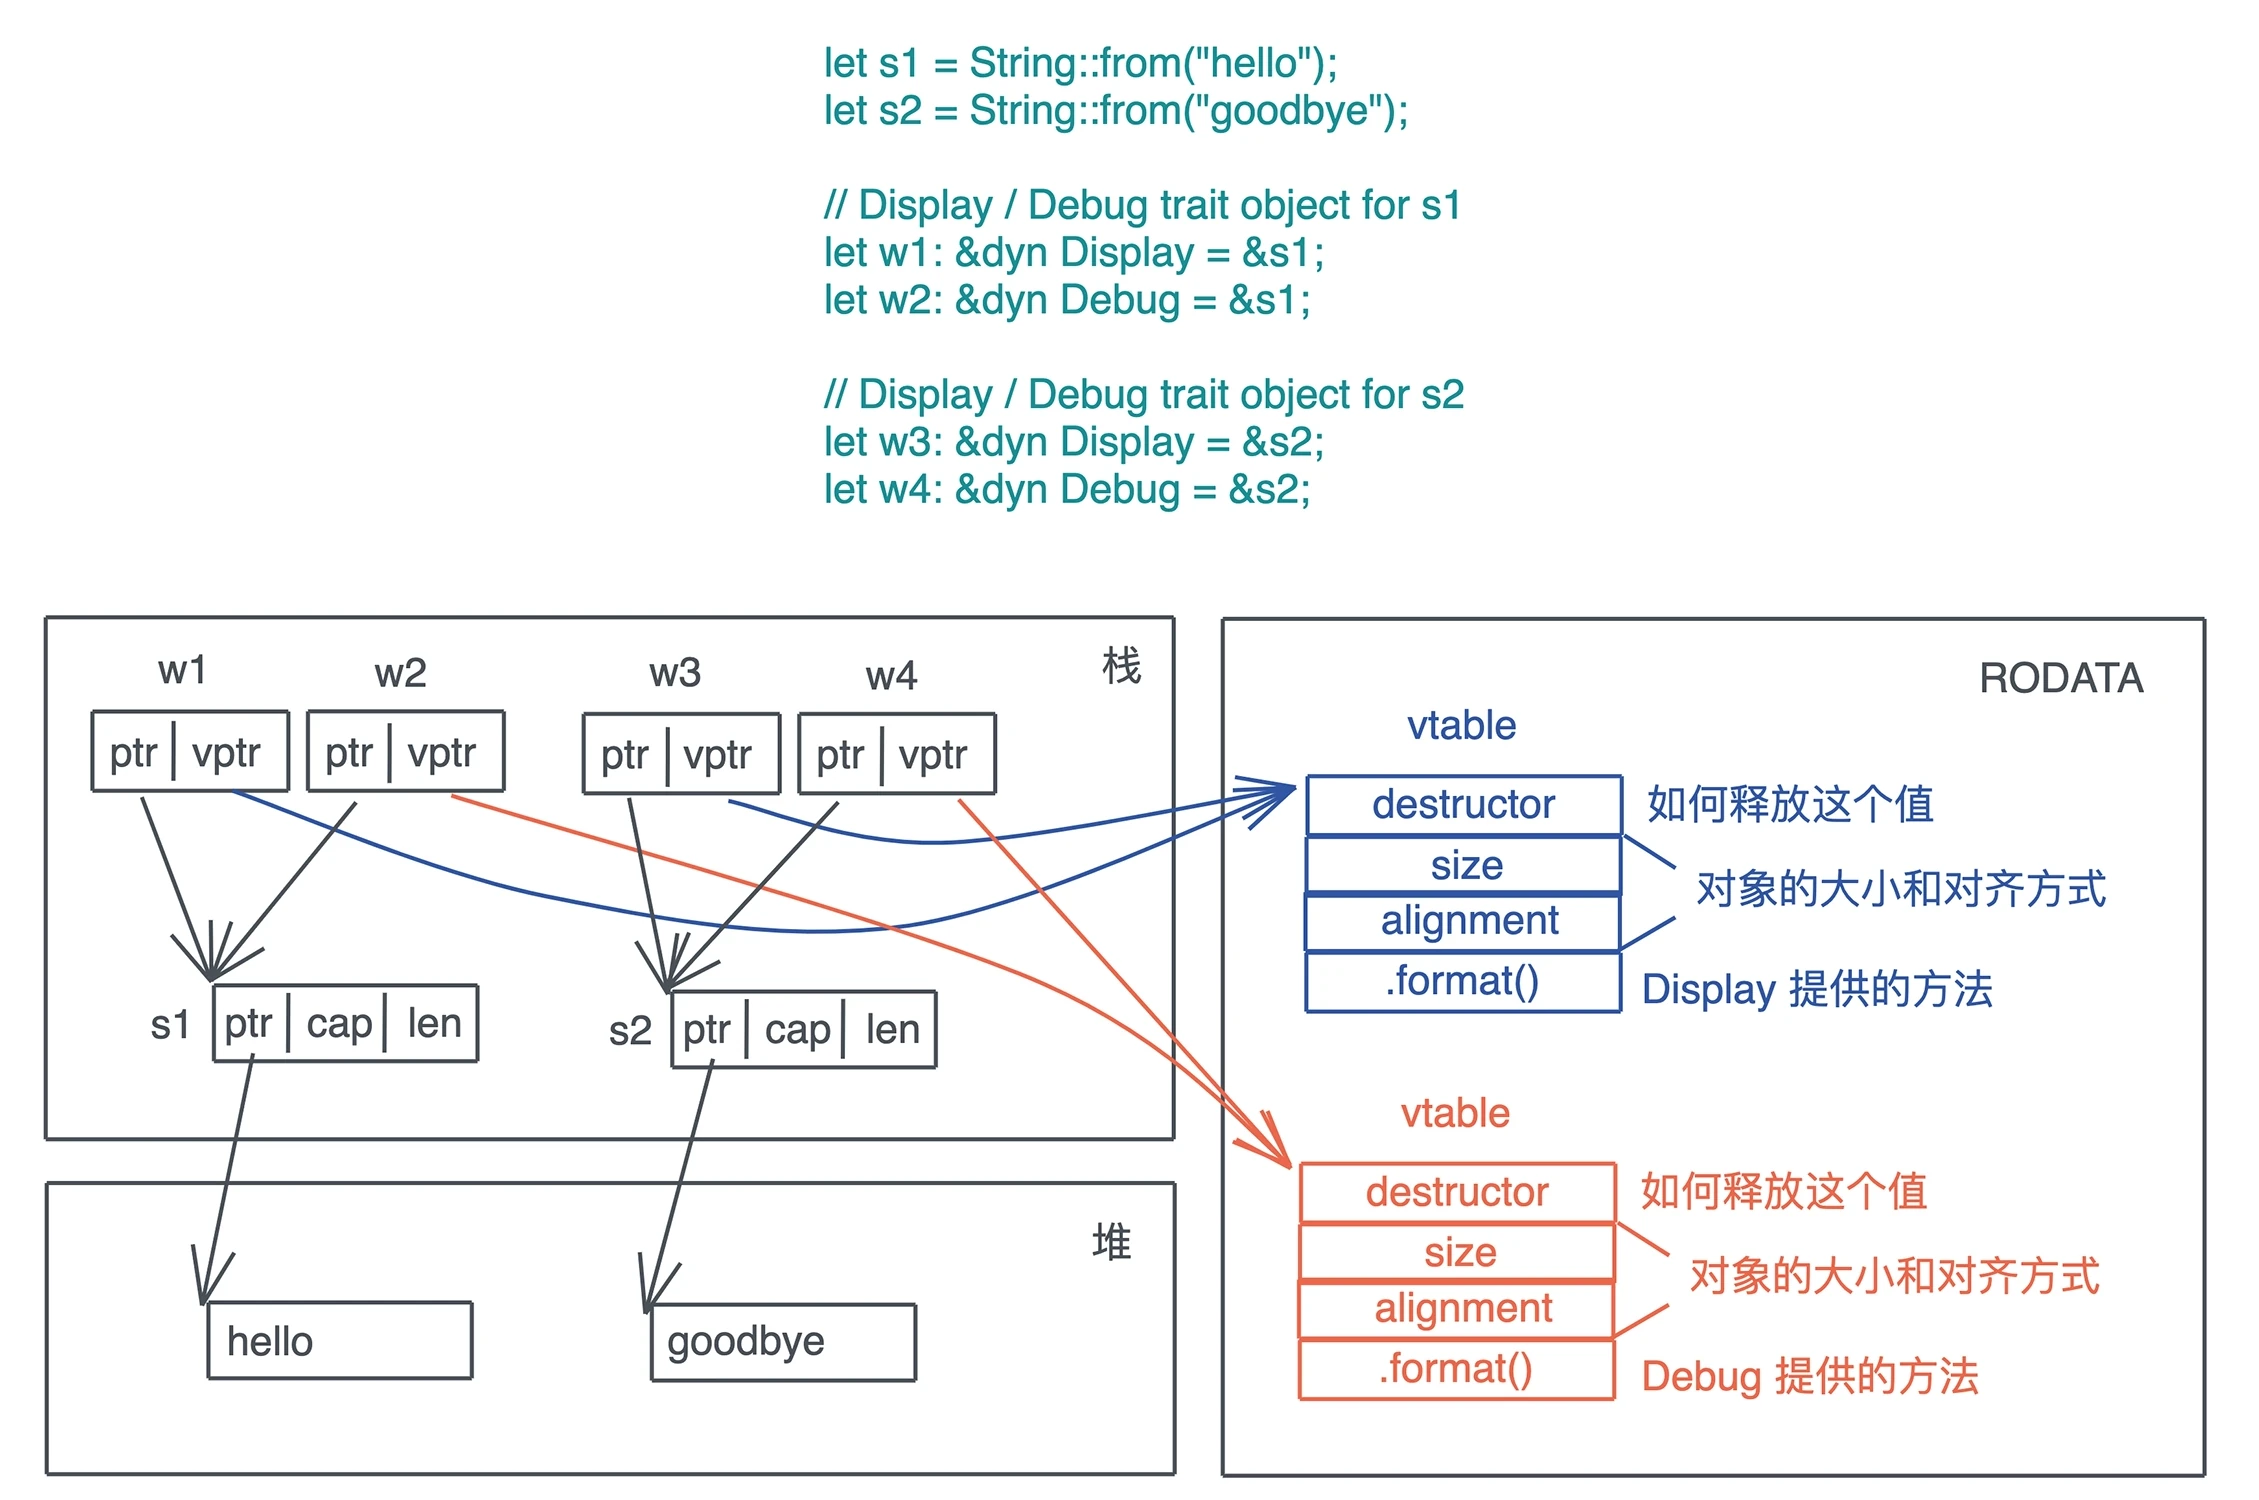
trait object 的底层逻辑就是旁指针,其中一个指针指向数据本身,另一个则指向虚函数表(vtable)。vtable 是一张静态的表,Rust 在编译时会为使用了 trait object 的类型的 trait 实现生成一张表,放在可执行文件中(一般在text或rodata段)。
如果 trait 所有的方法,返回值是 Self 或者携带泛型参数,那么这个 trait 就不能产生 trait object。trait object 在产生时,原来的类型会被抹去,所以 Self 究竟是谁不知道。Rust 里带泛型的类型在编译时会做单态化,而 trait object 是运行时的产物,两者不能兼容。如果一个 trait 只有部分方法返回 Self 或者携带泛型参数,那么这部分方法在 trait object 中不能被调用。
常用 trait 介绍
Clone
Clone 是深度拷贝,栈内存和堆内存一起拷贝。
#![allow(unused)]
fn main() {
pub trait Clone {
    // 在 clone 一个数据时只需要有已有数据的只读引用
    fn clone(&self) -> Self;

    fn clone_from(&mut self, source: &Self) {
        *self = source.clone()
    }
}
}
Copy
Copy trait 没有任何额外的方法,它只是一个标记 trait,可以用作 trait bound 来进行类型安全检查。
#![allow(unused)]
fn main() {
// 如果要实现 Copy trait 的话,必须实现 Clone trait。
pub trait Copy: Clone {}
}
Drop
#![allow(unused)]
fn main() {
pub trait Drop {
    fn drop(&mut self);
}
}
大部分场景无需为数据结构提供 Drop trait,系统默认会依次对数据结构的每个域做 drop。但有两种情况需要手动实现 Drop:
- 希望在数据结束生命周期的时候做一些事情,比如记录日志
- 需要对资源进行回收,比如锁资源的释放
Copy trait 和 Drop trait 是互斥的,两者不能共存。因为 Copy 是按位做浅拷贝,它拷贝的数据没有需要释放的资源,而 Drop 恰恰是为了释放额外的资源而生的。
Sized
Sized trait 用于标记有具体大小的类型。在使用泛型参数时,Rust 编译器会自动为泛型参数加上 Sized 约束。如果开发者显式定义了T: ?Sized,那么 T 就可以是任意大小。
Send / Sync 用于并发安全
#![allow(unused)]
fn main() {
pub unsafe auto trait Send {}
pub unsafe auto trait Sync {}
}
这里的 auto 意味着编译器会在合适的场合,自动为数据结构添加它们的实现。
如果一个类型 T 实现了 Send trait,意味着 T 可以安全地从一个线程移动到另一个线程,即所有权可以在线程间移动。 如果一个类型 T 实现了 Sync trait,意味着 &T 可以安全地在多个线程间共享。
对于 Send/Sync 在线程安全中的作用:如果一个类型 T: Send,那么 T 在某个线程中的独占访问是线程安全的;如果一个类型 T: Sync,那么 T 在线程间的只读共享是安全的。
引用计数 Rc<T> 不支持 Send 也不支持 Sync。所以 Rc<T> 无法跨线程。
RefCell<T> 实现了 Send,所以可以在线程间转移所有权。但没有实现 Sync,因此无法跨线程使用 Arc<RefCell<T>> 这样的数据(因为 Arc 内部的数据是共享的,需要支持 Sync 的数据结构)。
From<T> / Into<T> 用于从值到值的转换
#![allow(unused)]
fn main() {
pub trait From<T> {
    fn from(t: T) -> Self;
}

pub trait Into<T> {
    fn into(self) -> T;
}

// 实现 From 会自动实现 Into
impl<T, U> Into<U> for T where U: From<T> {
    fn into(self) -> U {
        U::from(self)
    }
}

// From(以及 Into)是自反的:把类型 T 的值转换成类型 T,会直接返回
impl<T> From<T> for T {
    fn from(t: T) -> T {
        t
    }
}
}
有了这两个 trait,函数的接口就可以变得灵活,比如函数如果接受一个 IpAddr 为参数,那就可以使用 Into<IpAddr> 让更多的类型可以被这个函数使用。
use std::net::{IpAddr, Ipv4Addr, Ipv6Addr};

fn print(v: impl Into<IpAddr>) {
    println!("{:?}", v.into());
}

fn main() {
    let v4: Ipv4Addr = "2.2.2.2".parse().unwrap();
    let v6: Ipv6Addr = "::1".parse().unwrap();

    // IPAddr 实现了 From<[u8; 4],转换 IPv4 地址
    print([1, 1, 1, 1]);
    // IPAddr 实现了 From<[u16; 8],转换 IPv6 地址
    print([0xfe80, 0, 0, 0, 0xaede, 0x48ff, 0xfe00, 0x1122]);
    // IPAddr 实现了 From<Ipv4Addr>
    print(v4);
    // IPAddr 实现了 From<Ipv6Addr>
    print(v6);
}
如果数据类型在转换过程中有可能出现错误,就需要使用 TryFrom<T> 和 TryInto<T>。
AsRef<T> / AsMut<T> 用于从引用到引用的转换
#![allow(unused)]
fn main() {
// T 使用大小可变的类型,如 str、[u8] 等
pub trait AsRef<T> where T: ?Sized {
    fn as_ref(&self) -> &T;
}

pub trait AsMut<T> where T: ?Sized {
    fn as_mut(&mut self) -> &mut T;
}
}
标准库中打开文件的接口 std::fs::File::open
#![allow(unused)]
fn main() {
pub fn open<P: AsRef<Path>>(path: P) -> io::Result<File>
}
意味着我们可以为这个参数传入 String、&str、PathBuf、Path 等类型,当使用 path.as_ref() 时,就能得到一个 &Path。
Deref / DerefMut
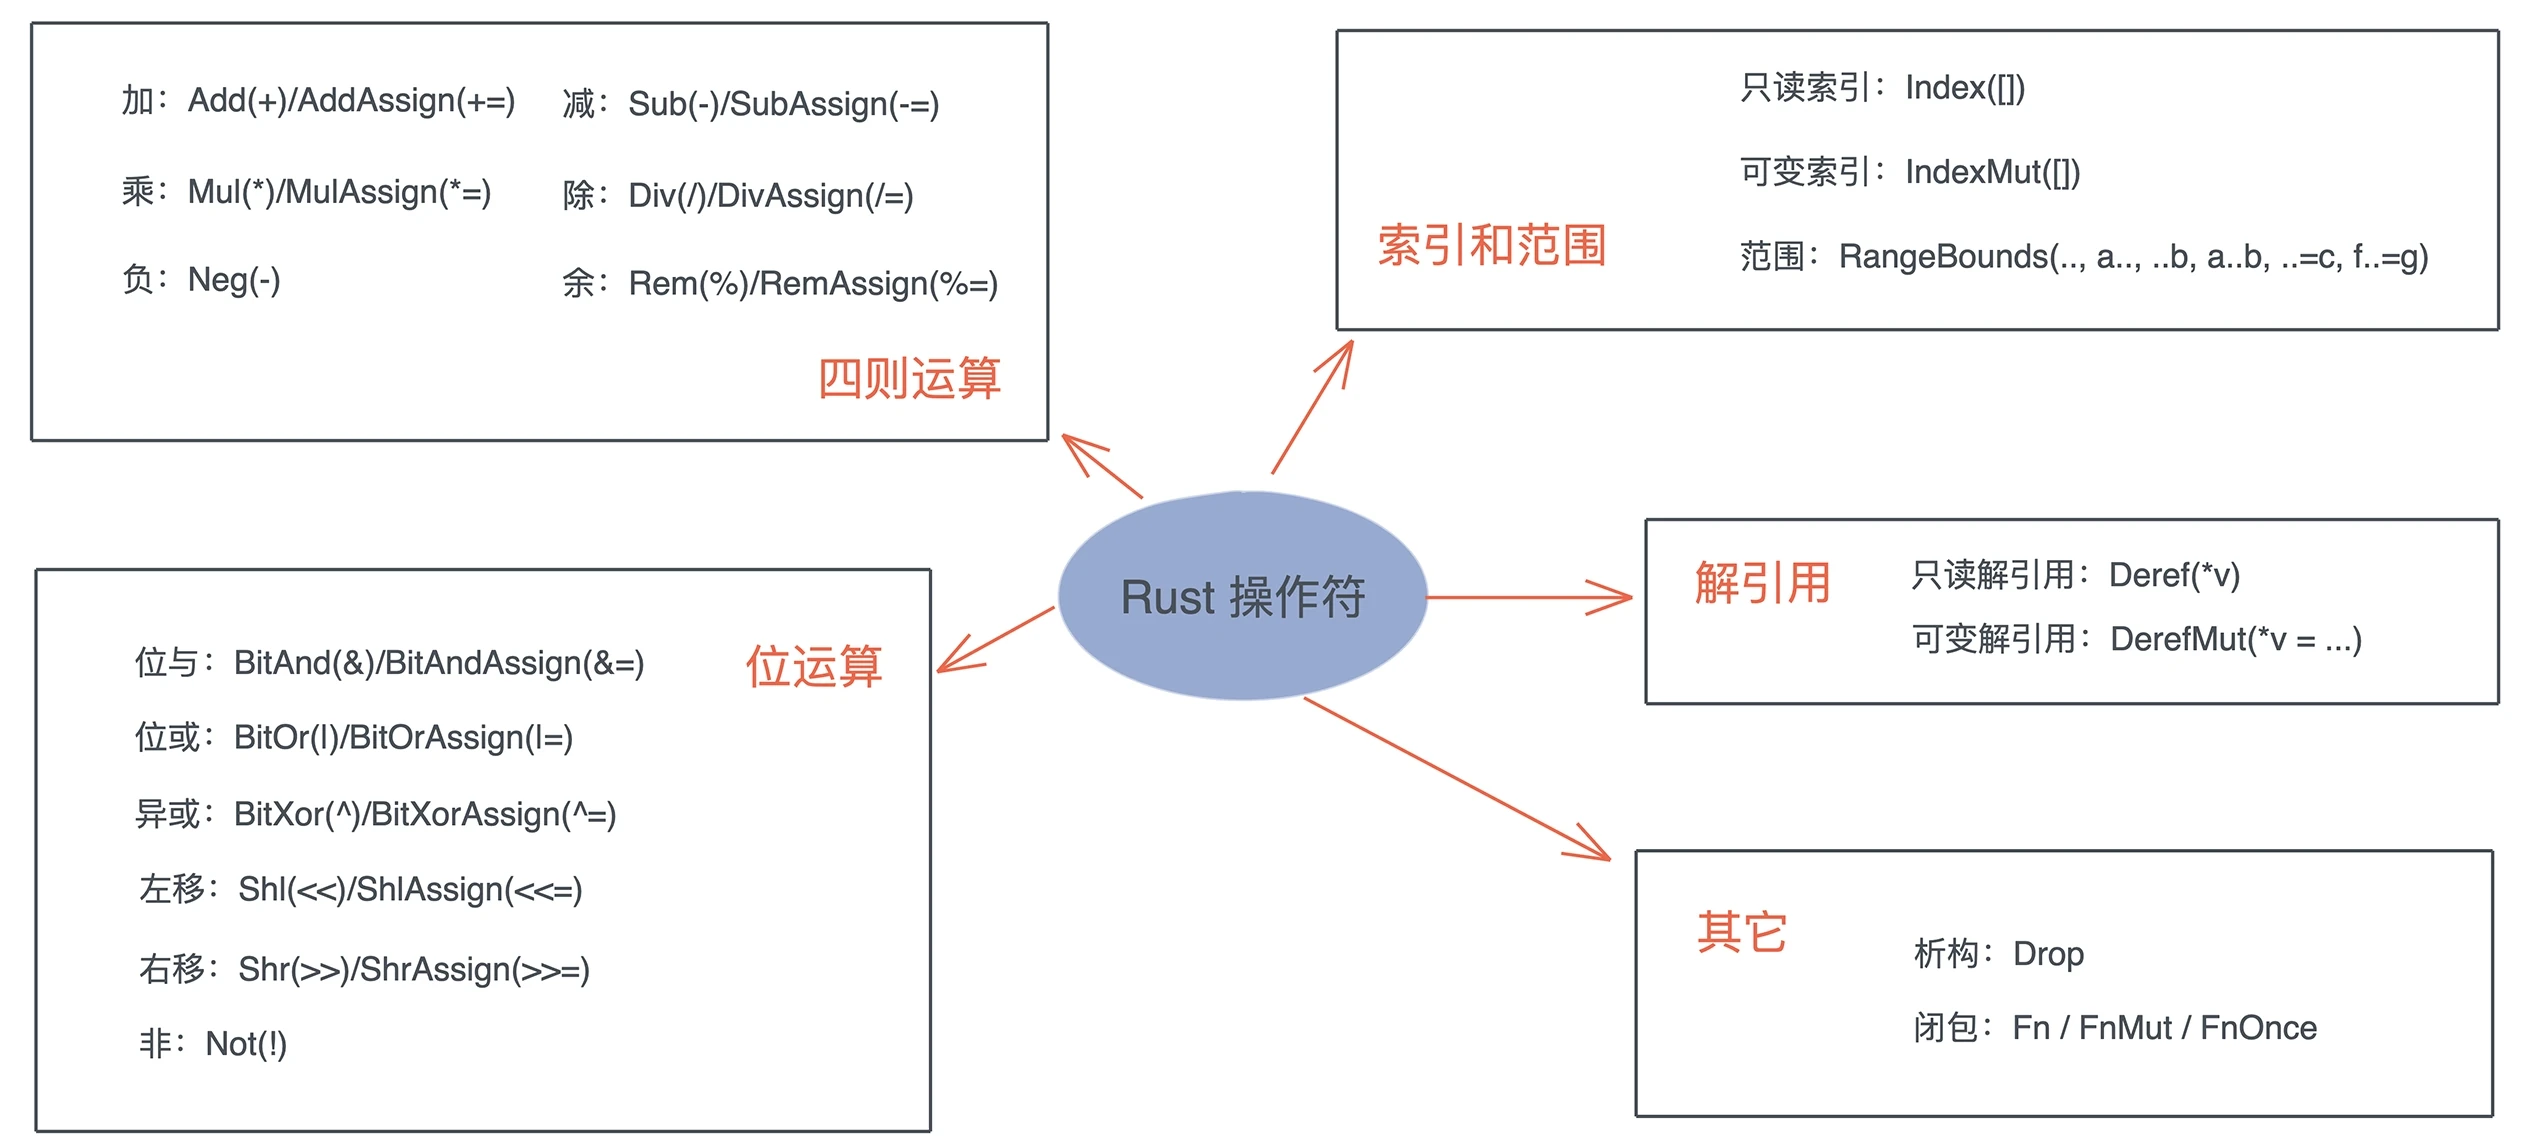
Rust 为所有的运算符都提供了 trait,我们可以给自定义类型重载某些操作符。
#![allow(unused)]
fn main() {
pub trait Deref {
    // 解引用出来的结果类型
    type Target: ?Sized;
    fn deref(&self) -> &Self::Target;
}

// DerefMut “继承”了 Deref
pub trait DerefMut: Deref {
    fn deref_mut(&mut self) -> &mut Self::Target;
}
}
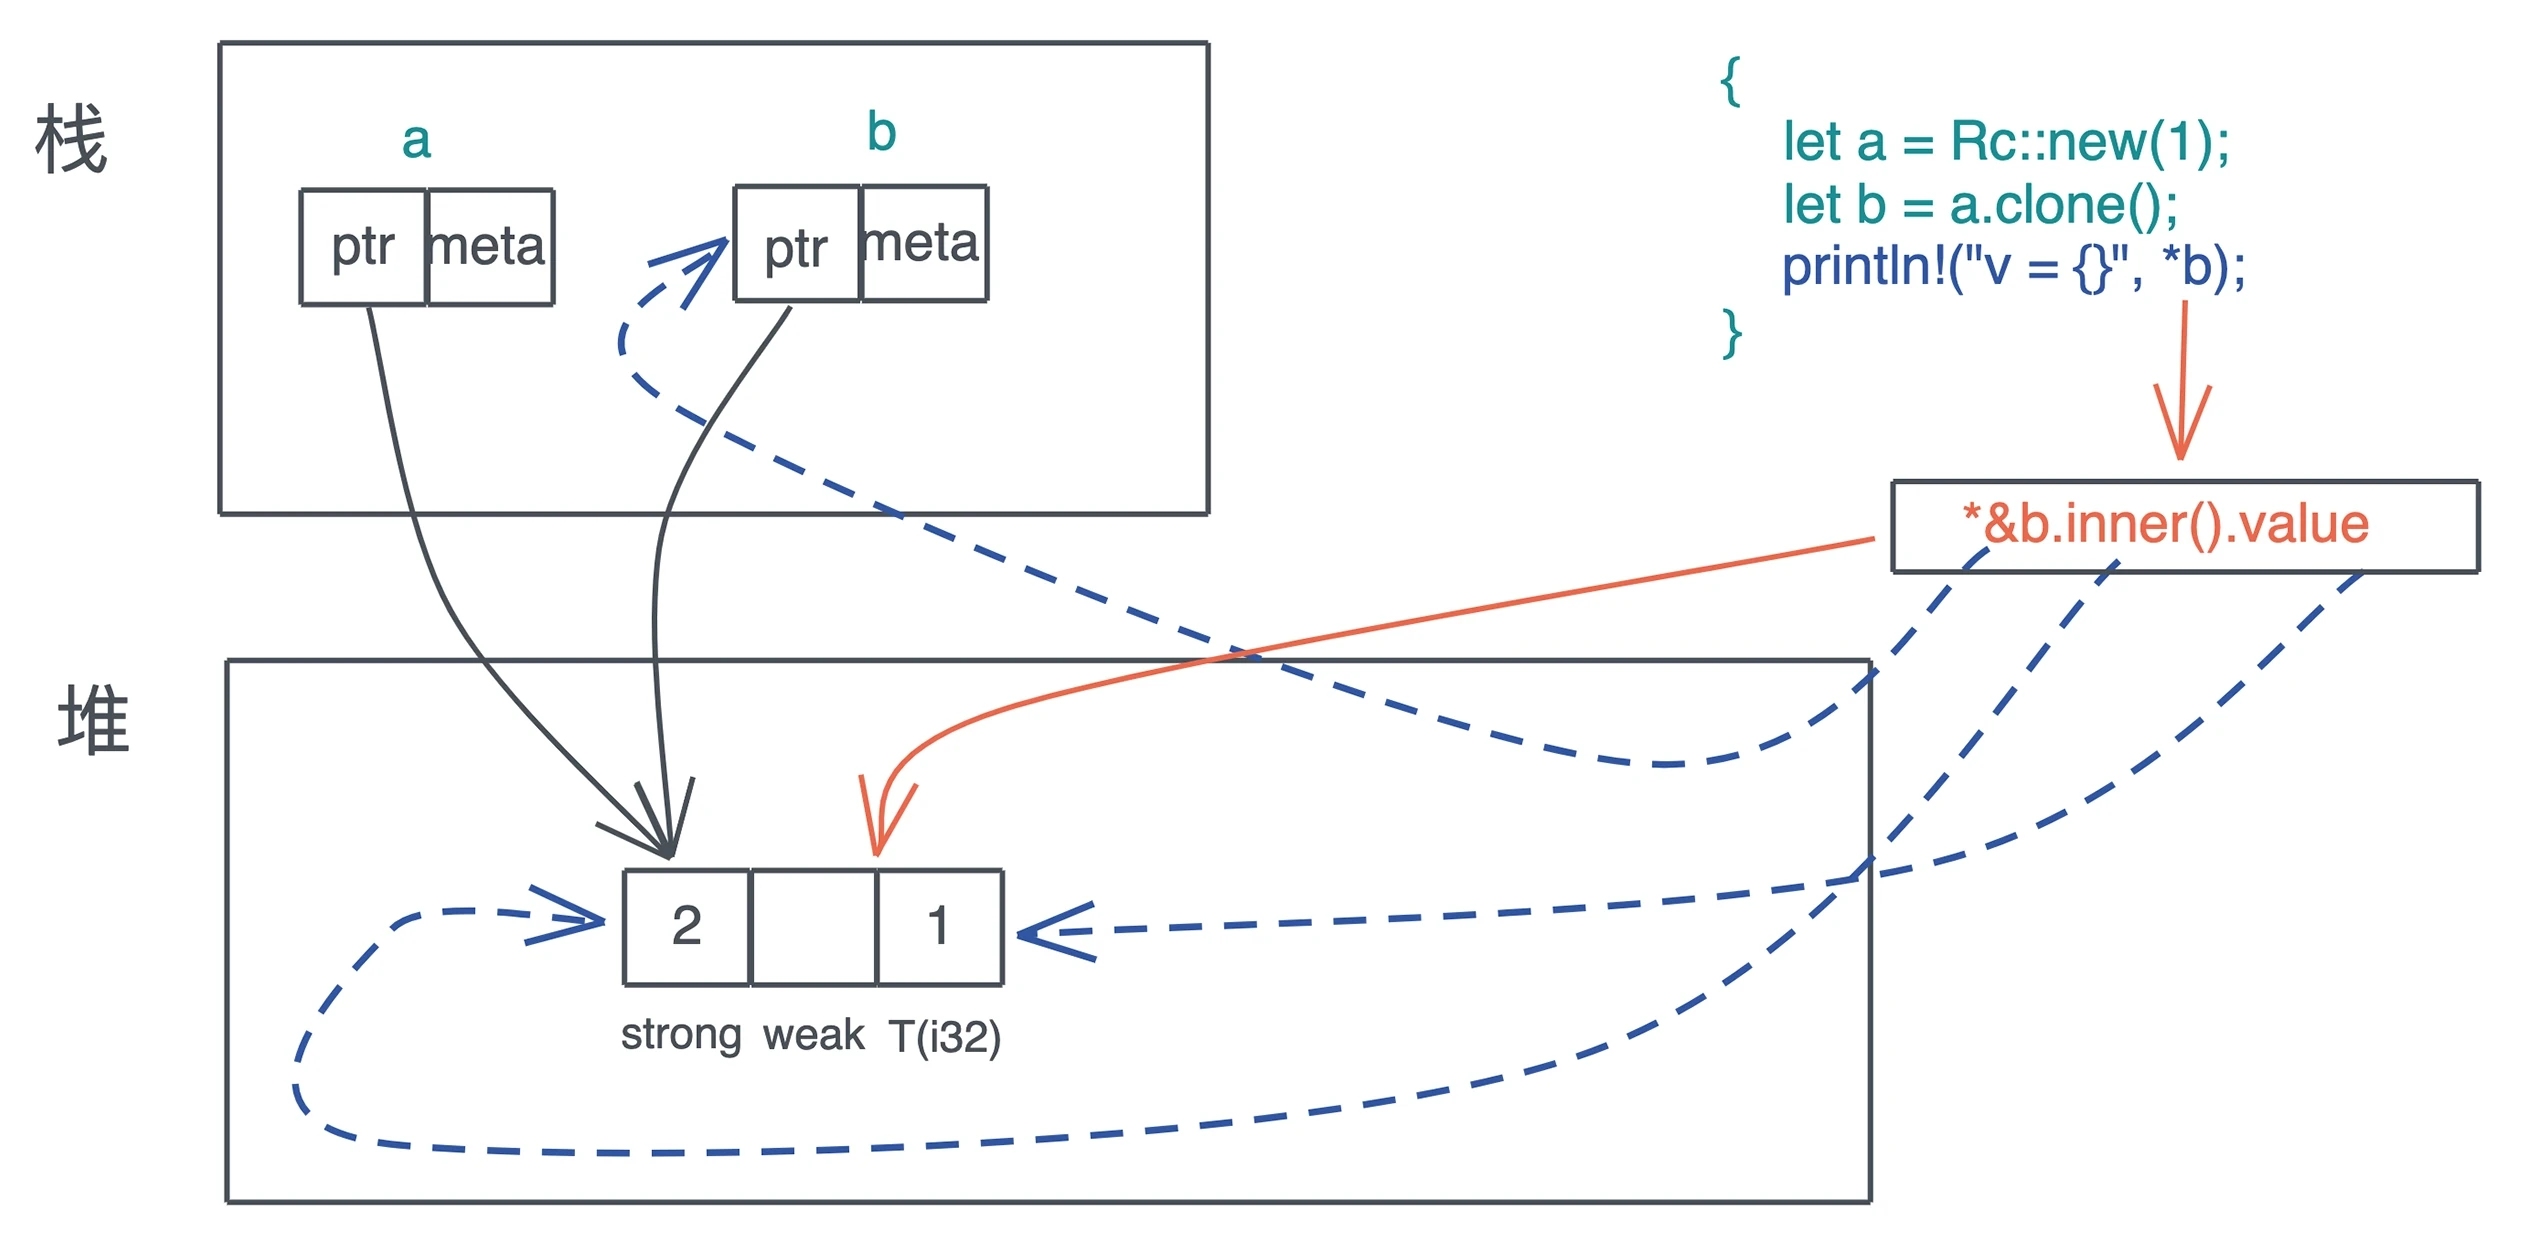
Deref 和 DerefMut 是自动调用的,*b 会被展开为 *(b.deref())。
Debug / Display
#![allow(unused)]
fn main() {
pub trait Debug {
    fn fmt(&self, f: &mut Formatter<'_>) -> Result<(), Error>;
}

pub trait Display {
    fn fmt(&self, f: &mut Formatter<'_>) -> Result<(), Error>;
}
}
Debug 是为开发者调试打印数据结构所设计的,而 Display 是给用户显示数据结构所设计的。Debug trait 的实现可以通过派生宏直接生成,而 Display 必须手工实现。在使用的时候,Debug 用 {:?} 来打印,Display 用 {} 打印。
Default 为类型提供缺省值
#![allow(unused)]
fn main() {
pub trait Default {
    fn default() -> Self;
}
}
可以通过 derive 宏 #[derive(Default)] 来生成实现,前提是类型中的每个字段都实现了 Default trait。注意,enum 不能通过 derive 宏来实现 Default,因为 enum 的每个变体都可能有不同的字段,所以需要手动实现。
在初始化一个数据结构时,我们可以部分初始化,然后剩余的部分使用 ..Default::default()。
智能指针
智能指针 vs 胖指针
智能指针一定是胖指针(比如 String),但是胖指针不一定是一个智能指针(比如 &str),因为 String 对堆上的值有所有权,而 &str 没有所有权。
可变引用可以传给需要不可变引用的函数
编译器不会报类型不匹配错误,因为可变引用可以隐式转换为不可变引用。
#![allow(unused)]
fn main() {
impl<T: ?Sized> Deref for &mut T {
    type Target = T;
    fn deref(&self) -> &T {
        *self
    }
}
}
智能指针 vs 结构体
凡是需要做资源回收的数据结构,且实现了 Deref/DerefMut/Drop,都是智能指针。
Box<T>
new 方法
#![allow(unused)]

fn main() {
#[cfg(not(no_global_oom_handling))]
#[inline(always)]
pub fn new(x: T) -> Self {
    // box 是 Rust 的内部关键字,在编译时,会使用内存分配器来分配内存
    box x
}
}
Box::new() 是一个函数,在 debug 模式下,传入它的数据会出现在栈上,再移动到堆上,有可能会引起栈溢出。在 release 模式下,该函数调用会被inline优化。
实现 Drop trait
#![allow(unused)]
fn main() {
unsafe impl<#[may_dangle] T: ?Sized, A: Allocator> Drop for Box<T, A> {
    fn drop(&mut self) {
        // Do nothing, drop is currently performed by compiler.
    }
}
}
Cow<'a, B>
#![allow(unused)]
fn main() {
pub enum Cow<'a, B> where B: 'a + ToOwned + ?Sized {
  Borrowed(&'a B),
  Owned(<B as ToOwned>::Owned),
}
}
Cow 包裹了一个只读借用,但如果调用者需要所有权或者需要修改内容,那么它会 clone 借用的数据。这种数据结构可以减少不必要的堆内存分配,提升系统效率。
#![allow(unused)]
fn main() {
pub trait ToOwned {
    type Owned: Borrow<Self>;
    #[must_use = "cloning is often expensive and is not expected to have side effects"]
    fn to_owned(&self) -> Self::Owned;

    fn clone_into(&self, target: &mut Self::Owned) { ... }
}

// Borrow 是个泛型 trait,表明一个类型可以被借用成不同的引用
// 比如 String 可以被借用为 &String 或者 &str
pub trait Borrow<Borrowed> where Borrowed: ?Sized {
    fn borrow(&self) -> &Borrowed;
}
}
str 对 ToOwned trait 的实现:
#![allow(unused)]
fn main() {
impl ToOwned for str {
    type Owned = String;
    #[inline]
    fn to_owned(&self) -> String {
        unsafe { String::from_utf8_unchecked(self.as_bytes().to_owned()) }
    }

    fn clone_into(&self, target: &mut String) {
        let mut b = mem::take(target).into_bytes();
        self.as_bytes().clone_into(&mut b);
        *target = unsafe { String::from_utf8_unchecked(b) }
    }
}
}
同时 String 必须要实现 Borrow<str> trait,这样能符合 ToOwned 的要求。
#![allow(unused)]
fn main() {
impl Borrow<str> for String {
    #[inline]
    fn borrow(&self) -> &str {
        &self[..]
    }
}
}
给 Cow 实现 Deref
#![allow(unused)]
fn main() {
impl<B: ?Sized + ToOwned> Deref for Cow<'_, B> {
    type Target = B;

    fn deref(&self) -> &B {
        // 我们分别取其内容,生成引用
        match *self {
            Borrowed(borrowed) => borrowed, // 对于 Borrowed,直接就是取出当中的引用
            Owned(ref owned) => owned.borrow(), // 对于 Owned,调用其 borrow() 方法,获得引用
        }
    }
}
}
应用案例
use std::borrow::Cow;
use url::Url;

fn main() {
    let url = Url::parse("https://tyr.com/rust?page=1024&sort=desc&extra=hello%20world").unwrap();
    let mut pairs = url.query_pairs();

    assert_eq!(pairs.count(), 3);

    let (mut k, v) = pairs.next().unwrap();
    // 因为 k, v 都是 Cow<str> 他们用起来感觉和 &str 或者 String 一样
    // 此刻,他们都是 Borrowed
    println!("key: {}, v: {}", k, v);
    // 当修改发生时,k 变成 Owned
    k.to_mut().push_str("_lala");

    print_pairs((k, v));

    print_pairs(pairs.next().unwrap());
    // 在处理 extra=hello%20world 时,value 被处理成 "hello world"
    // 所以这里 value 是 Owned
    print_pairs(pairs.next().unwrap());
}

fn print_pairs(pair: (Cow<str>, Cow<str>)) {
    println!("key: {}, value: {}", show_cow(pair.0), show_cow(pair.1));
}

fn show_cow(cow: Cow<str>) -> String {
    match cow {
        Cow::Borrowed(v) => format!("Borrowed {}", v),
        Cow::Owned(v) => format!("Owned {}", v),
    }
}
use serde::Deserialize;
use std::borrow::Cow;

#[derive(Debug, Deserialize)]
struct User<'input> {
    #[serde(borrow)]
    name: Cow<'input, str>,
    age: u8,
}

fn main() {
    let input = r#"{ "name": "Tyr", "age": 18 }"#;
    let user: User = serde_json::from_str(input).unwrap();

    match user.name {
        Cow::Borrowed(x) => println!("borrowed {}", x),
        Cow::Owned(x) => println!("owned {}", x),
    }
}
MutexGuard<T>
MutexGuard 通过 Drop trait 来确保退出时释放互斥锁,这样用户在使用 Mutex 时,可以不必关心何时释放这个互斥锁。因为无论你在调用栈上怎样传递 MutexGuard ,哪怕在错误处理流程上提前退出,Rust 的所有权机制可以确保只要 MutexGuard 离开作用域,锁就会被释放。
MutexGuard 不允许 Send,只允许 Sync,也就是说,你可以把 MutexGuard 的引用传给另一个线程使用,但你无法把 MutexGuard 整个移动到另一个线程。这样可以避免因加锁和解锁在不同的线程下带来的死锁风险。
use std::borrow::Cow;
use std::collections::HashMap;
use std::sync::{Arc, Mutex};
use std::thread;
use std::time::Duration;

fn main() {
    // 用 Arc 来提供并发环境下的共享所有权(使用引用计数)
    let metrics: Arc<Mutex<HashMap<Cow<'static, str>, usize>>> =
        Arc::new(Mutex::new(HashMap::new()));
    for _ in 0..32 {
        let m = metrics.clone();
        thread::spawn(move || {
            let mut g = m.lock().unwrap();
            // 此时只有拿到 MutexGuard 的线程可以访问 HashMap
            let data = &mut *g;
            // Cow 实现了很多数据结构的 From trait,
            // 所以我们可以用 "hello".into() 生成 Cow
            let entry = data.entry("hello".into()).or_insert(0);
            *entry += 1;
            // MutexGuard 被 Drop,锁被释放
        });
    }

    thread::sleep(Duration::from_millis(100));

    println!("metrics: {:?}", metrics.lock().unwrap());
}
内存分配器
替换默认的内存分配器
堆上分配内存的 Box<T> 有一个缺省的泛型参数 A,需要满足 Allocator,并且默认是 Global,这个 Global 就是默认的内存分配器。
use jemallocator::Jemalloc;

#[global_allocator]
static GLOBAL: Jemalloc = Jemalloc;

fn main() {}
自定义内存分配器
如果想要编写一个全局分配器,可以实现 GlobalAlloc trait,它和 Allocator trait 的主要区别在于是否允许分配长度为0的内存。
use std::alloc::{GlobalAlloc, Layout, System};

struct MyAllocator;

unsafe impl GlobalAlloc for MyAllocator {
    unsafe fn alloc(&self, layout: Layout) -> *mut u8 {
        let data = System.alloc(layout);
        // 这里不能使用 println!()
        // stdout 会打印到一个由 Mutex 互斥锁保护的共享全局 buffer 中,这个过程中会涉及内存的分配
        // 分配的内存又会触发 println!(),最终造成程序崩溃
        // eprintln! 直接打印到 stderr,不会 buffer
        eprintln!("ALLOC: {:p}, size {}", data, layout.size());
        data
    }

    unsafe fn dealloc(&self, ptr: *mut u8, layout: Layout) {
        System.dealloc(ptr, layout);
        eprintln!("FREE: {:p}, size {}", ptr, layout.size());
    }
}

#[global_allocator]
static GLOBAL: MyAllocator = MyAllocator;

#[allow(dead_code)]
struct Matrix {
    // 使用不规则的数字如 505 可以让 dbg! 的打印很容易分辨出来
    data: [u8; 505],
}

impl Default for Matrix {
    fn default() -> Self {
        Self { data: [0; 505] }
    }
}

fn main() {
    // 在这句执行之前已经有好多内存分配
    let data = Box::new(Matrix::default());

    // 输出中有一个 1024 大小的内存分配,是 println! 导致的
    println!(
        "!!! allocated memory: {:p}, len: {}",
        &*data,
        std::mem::size_of::<Matrix>()
    );

    // data 在这里 drop,可以在打印中看到 FREE
    // 之后还有很多其它内存被释放
}
Standard Error 中输出的结果如下:
ALLOC: 0x55c63eb5b940, size 5
ALLOC: 0x55c63eb5b960, size 48
ALLOC: 0x55c63eb5b9d0, size 505
ALLOC: 0x55c63eb5b500, size 1024
FREE: 0x55c63eb5b9d0, size 505
FREE: 0x55c63eb5b500, size 1024
FREE: 0x55c63eb5b940, size 5
FREE: 0x55c63eb5b960, size 48
切片
当我们构建自己的数据结构时,如果它内部也有连续排列的等长的数据结构,可以考虑 AsRef 或者 Deref 到切片。
切片是描述一组属于同一类型、长度不确定的、在内存中连续存放的数据结构,用 [T] 来表述。因为长度不确定,所以切片是个 DST(Dynamically Sized Type)。在使用中主要用以下形式:
- &[T]:表示一个只读的切片引用
- &mut [T]:表示一个可写的切片引用
- Box<[T]>:一个在堆上分配的切片。
fn main() {
    let arr = [1, 2, 3, 4, 5];
    let vec = vec![1, 2, 3, 4, 5];
    let s1 = &arr[..2];
    let s2 = &vec[..2];
    println!("s1: {:?}, s2: {:?}", s1, s2);

    // &[T] 和 &[T] 是否相等取决于长度和内容是否相等
    assert_eq!(s1, s2);
    // &[T] 可以和 Vec<T>/[T;n] 比较,也会看长度和内容
    // 这是因为它们之间实现了 PartialEq trait
    assert_eq!(&arr[..], vec);
    assert_eq!(&vec[..], arr);
}
在使用的时候,支持切片的具体数据类型,可以根据需要,解引用转换成切片类型。比如 Vec 和 [T; n] 会转化成为 &[T],这是因为 Vec 实现了 Deref trait,而 array 内建了到 &[T] 的解引用。这也就意味着,通过解引用,这几个和切片有关的数据结构都会获得切片的所有能力,包括:binary_search、chunks、concat、contains、start_with、end_with、group_by、iter、join、sort、split、swap 等一系列丰富的功能。
use std::fmt;
fn main() {
    let v = vec![1, 2, 3, 4];

    // Vec 实现了 Deref,&Vec<T> 会被自动解引用为 &[T],符合接口定义
    print_slice(&v);
    // 直接是 &[T],符合接口定义
    print_slice(&v[..]);

    // &Vec<T> 支持 AsRef<[T]>
    print_slice1(&v);
    // &[T] 支持 AsRef<[T]>
    print_slice1(&v[..]);
    // Vec<T> 也支持 AsRef<[T]>
    print_slice1(v);

    let arr = [1, 2, 3, 4];
    // 数组虽没有实现 Deref,但它的解引用就是 &[T]
    print_slice(&arr);
    print_slice(&arr[..]);
    print_slice1(&arr);
    print_slice1(&arr[..]);
    print_slice1(arr);
}

fn print_slice<T: fmt::Debug>(s: &[T]) {
    println!("{:?}", s);
}

fn print_slice1<T, U>(s: T)
where
    T: AsRef<[U]>,
    U: fmt::Debug,
{
    println!("{:?}", s.as_ref());
}
将 slice 转化成迭代器
fn main() {
    // 这里 Vec 在调用 iter() 时被解引用成 &[T],所以可以访问 iter()
    let result: Vec<i32> = vec![1, 2, 3, 4]
        .iter()
        .map(|v| v * v)
        .filter(|v| *v < 16)
        .collect();

    println!("{:?}", result);
}
Rust 下的迭代器是个懒接口(lazy interface),也就是说这段代码直到运行到 collect 时才真正开始执行,之前的部分不过是在不断地生成新的结构,来累积处理逻辑而已。Rust 大量使用了 inline 等优化技巧,使得迭代器的性能和 C 语言的 for 循环差别不大。
此外,itertools crate 还提供了额外的,标准库中没有提供的迭代器。
use itertools::Itertools;

fn main() {
    let err_str = "bad happened";
    let input = vec![Ok(21), Err(err_str), Ok(7)];
    let it = input
        .into_iter()
        // 对成功的结果进一步做 filter/map 操作
        .filter_map_ok(|i| if i > 10 { Some(i * 2) } else { None });
    // 结果应该是:vec![Ok(42), Err(err_str)]
    println!("{:?}", it.collect::<Vec<_>>());
}
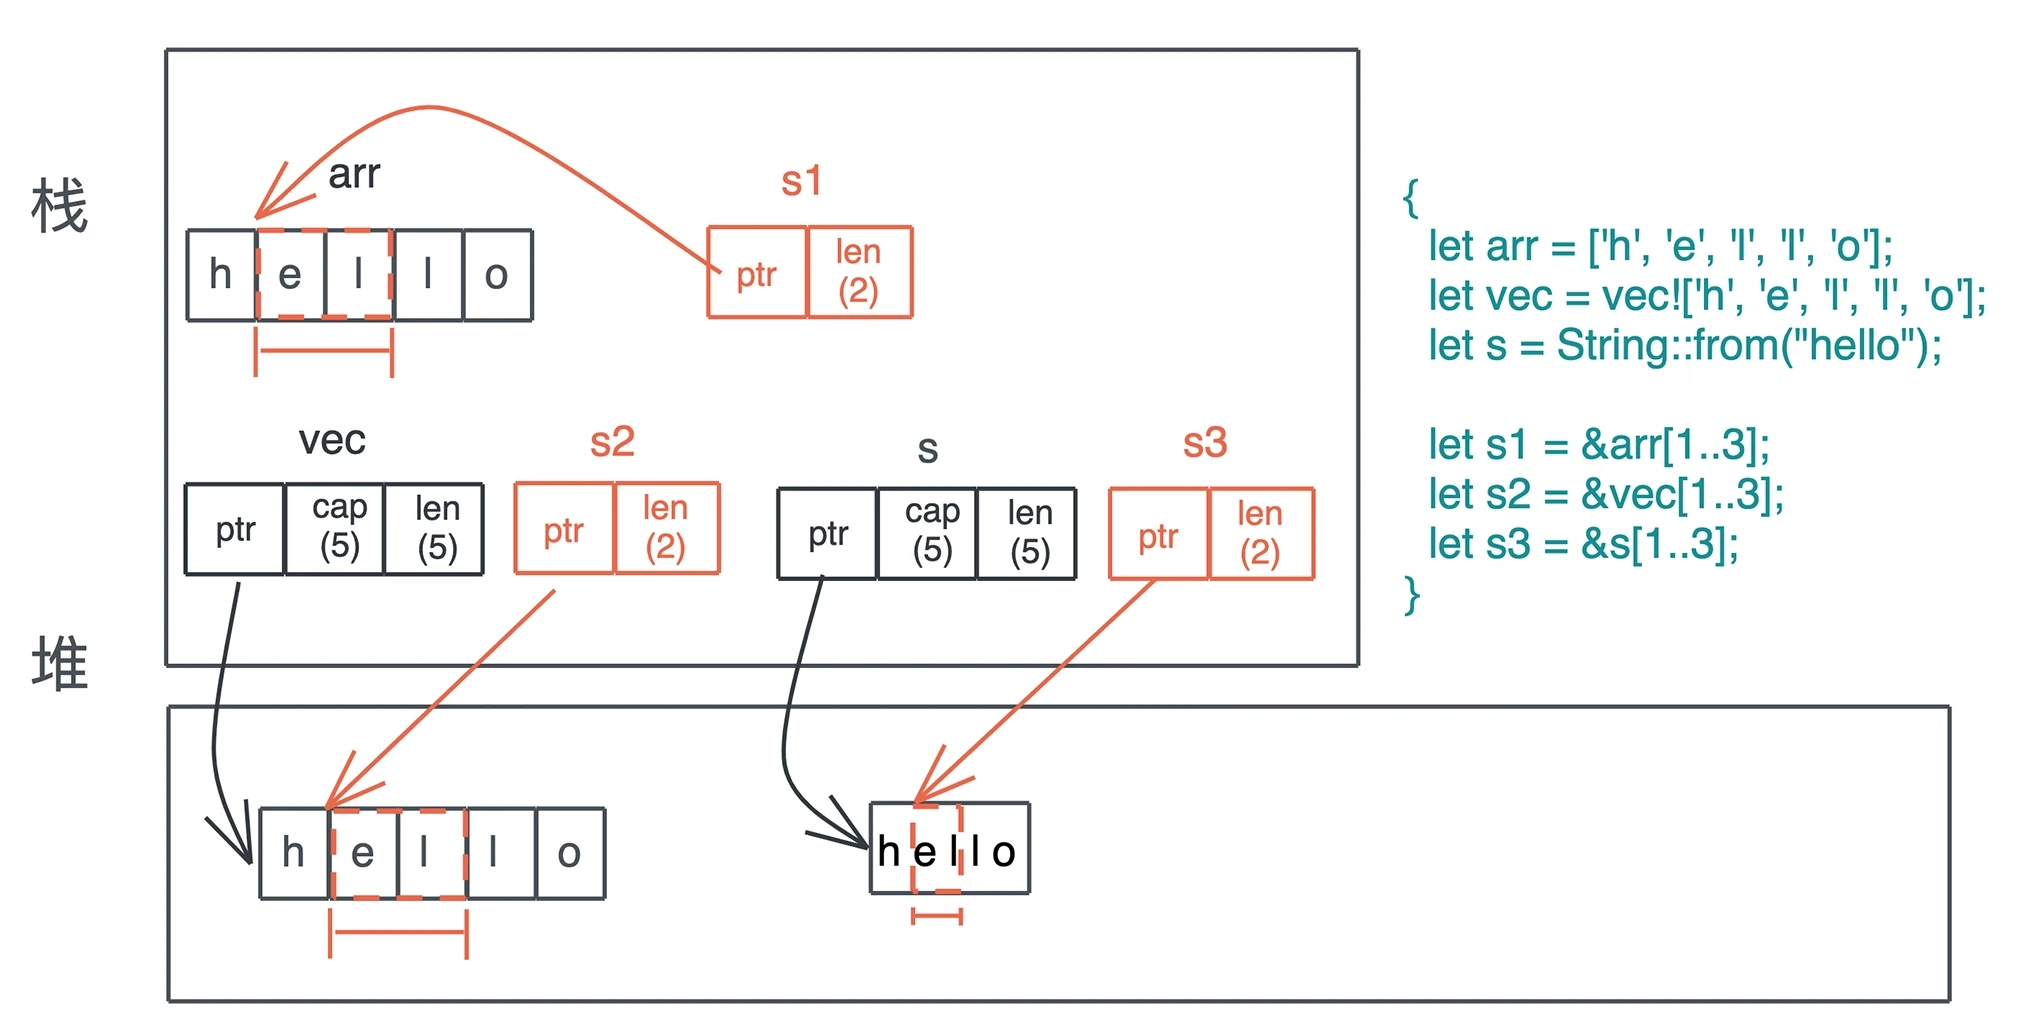
特殊的切片 &str
use std::iter::FromIterator;

fn main() {
    let arr = ['h', 'e', 'l', 'l', 'o'];
    let vec = vec!['h', 'e', 'l', 'l', 'o'];
    let s = String::from("hello");
    let s1 = &arr[1..3];
    let s2 = &vec[1..3];
    // &str 本身就是一个特殊的 slice
    let s3 = &s[1..3];
    println!("s1: {:?}, s2: {:?}, s3: {:?}", s1, s2, s3);

    // &[char] 和 &[char] 是否相等取决于长度和内容是否相等
    assert_eq!(s1, s2);
    // &[char] 和 &str 不能直接对比,我们把 s3 变成 Vec<char>
    assert_eq!(s2, s3.chars().collect::<Vec<_>>());
    // &[char] 可以通过迭代器转换成 String,String 和 &str 可以直接对比
    assert_eq!(String::from_iter(s2), s3);
}
字符列表可以通过迭代器转换成 String,String 也可以通过 chars() 函数转换成字符列表,如果不转换,二者不能比较。
Box<[T]> 堆上的切片
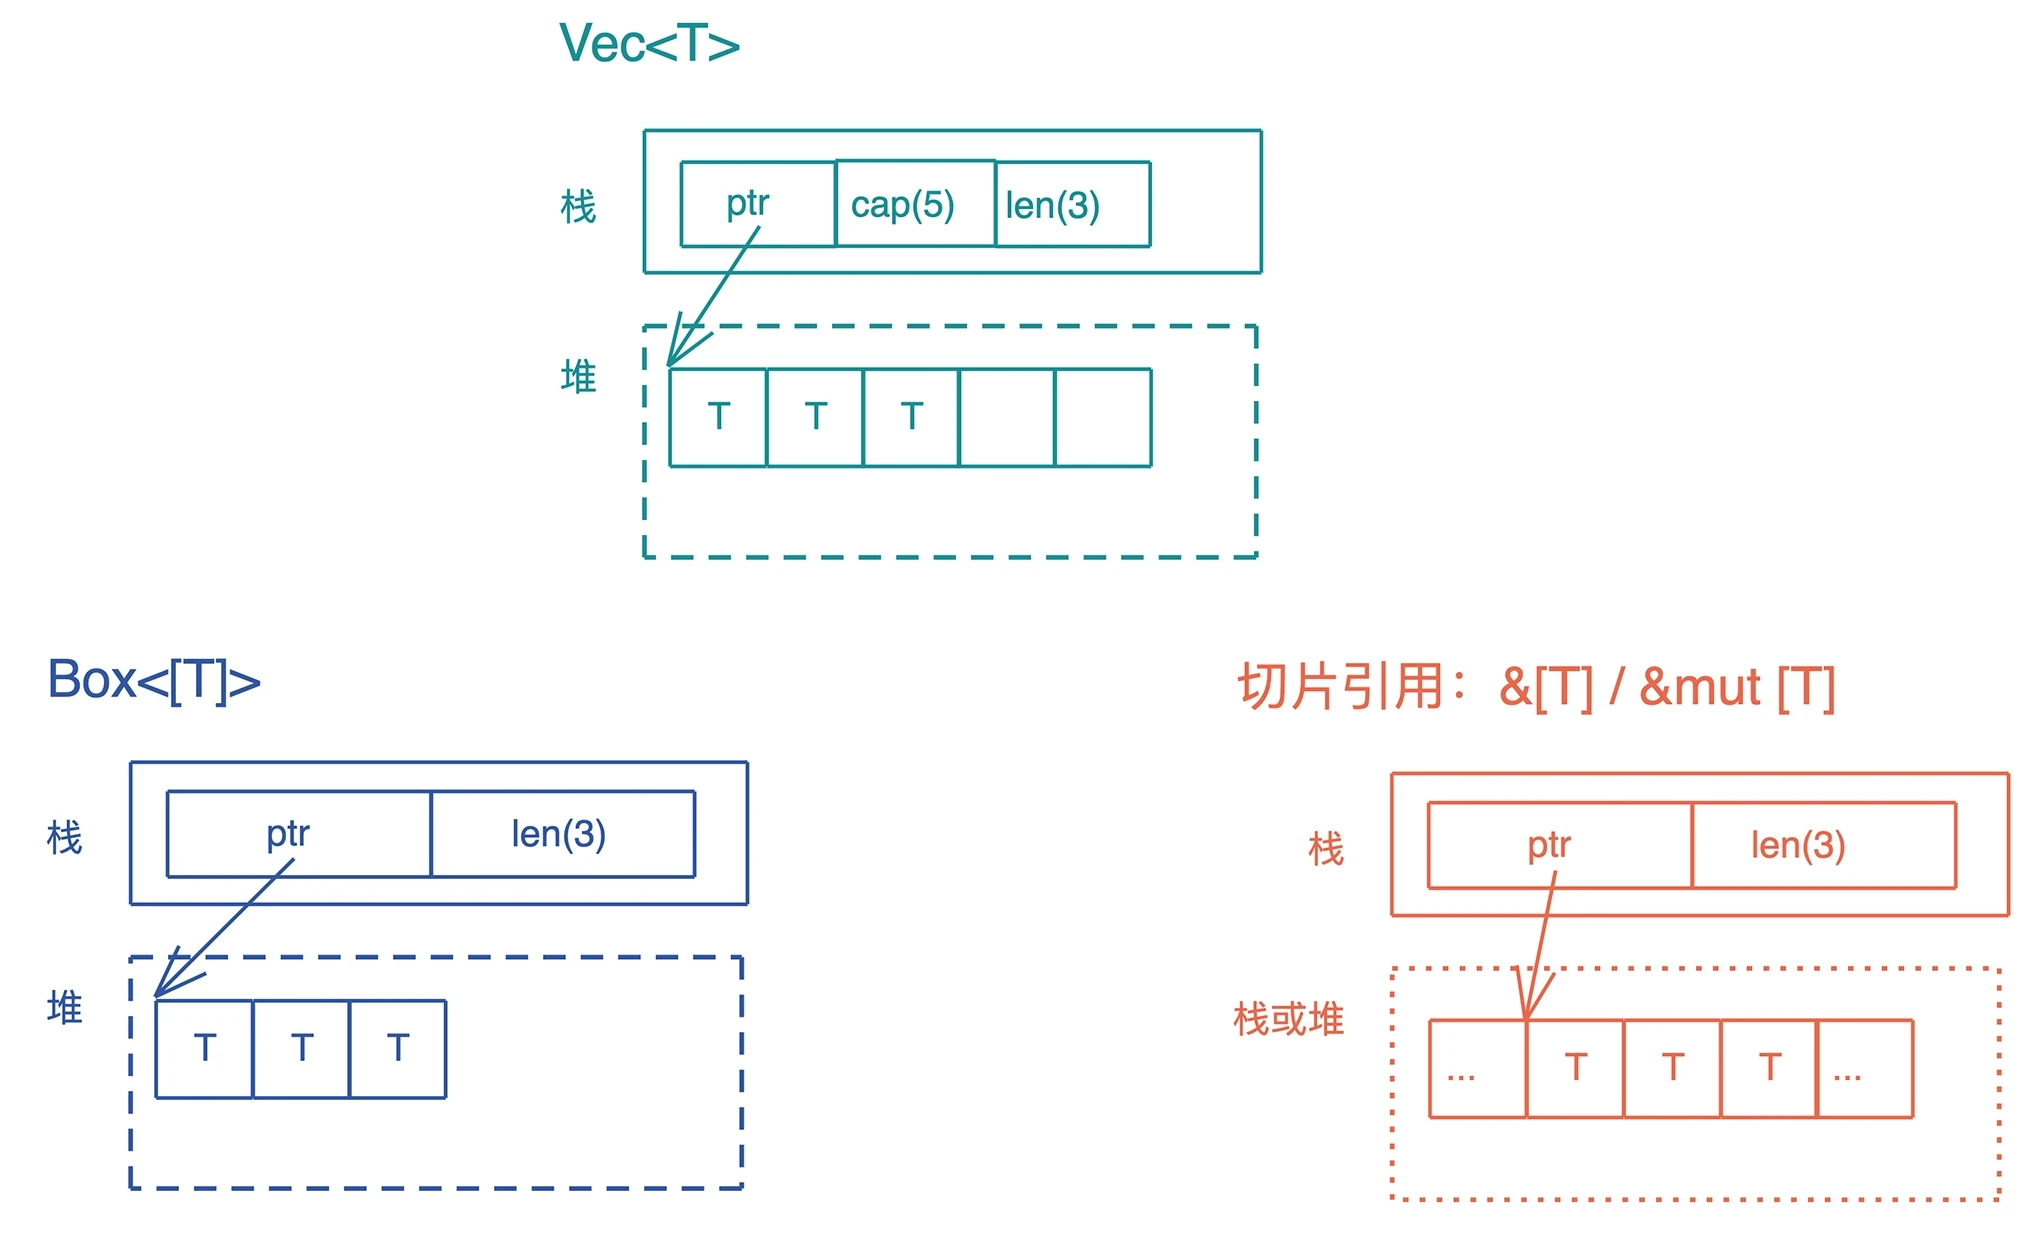
Box<[T]> 和切片的引用 &[T] 很类似:它们都是在栈上有一个包含长度的胖指针,指向存储数据的内存位置。区别是:Box<[T]> 只会指向堆,&[T] 指向的位置可以是栈也可以是堆;此外,Box<[T]> 对数据具有所有权,而 &[T] 只是一个借用。
Box<[T]> 和 Vec<T> 有一点点差别:Vec<T> 有额外的 capacity,可以增长;而 Box<[T]> 一旦生成就固定下来,没有 capacity,也无法增长。
use std::ops::Deref;

fn main() {
    let mut v1 = vec![1, 2, 3, 4];
    v1.push(5);
    println!("cap should be 8: {}", v1.capacity());

    // 从 Vec<T> 转换成 Box<[T]>,此时会丢弃多余的 capacity
    let b1 = v1.into_boxed_slice();
    let mut b2 = b1.clone();

    let v2 = b1.into_vec();
    println!("cap should be exactly 5: {}", v2.capacity());

    assert!(b2.deref() == v2);

    // Box<[T]> 可以更改其内部数据,但无法 push
    b2[0] = 2;
    // b2.push(6);
    println!("b2: {:?}", b2);

    // 注意 Box<[T]> 和 Box<[T; n]> 并不相同
    let b3 = Box::new([2, 2, 3, 4, 5]);
    println!("b3: {:?}", b3);

    // b2 和 b3 相等,但 b3.deref() 和 v2 无法比较
    assert!(b2 == b3);
    // assert!(b3.deref() == v2);
}
Vec<T> 可以通过 into_boxed_slice() 转换成 Box<[T]>,Box<[T]> 也可以通过 into_vec() 转换回 Vec<T>。
Box<[T]> 有一个很好的特性是,不像 Box<[T;n]> 那样在编译时就要确定大小,它可以在运行期生成,以后大小不会再改变。
HashMap
Rust 哈希表不是用冲突链来解决哈希冲突,而是用开放寻址法的二次探查来解决的。
如果只需要简单确认元素是否在集合中,可以用 HashSet,它就是简化的 HashMap,可以用来存放无序的集合。
#![allow(unused)]
fn main() {
use hashbrown::hash_map as base;

// RandomState 使用 SipHash 作为缺省的哈希算法
#[derive(Clone)]
pub struct RandomState {
    k0: u64,
    k1: u64,
}

pub struct HashMap<K, V, S = RandomState> {
    // 复用了 hashbrown 库的 HashMap
    base: base::HashMap<K, V, S>,
}

// hashbrown 库的 HashMap
pub struct HashMap<K, V, S = DefaultHashBuilder, A: Allocator + Clone = Global> {
    pub(crate) hash_builder: S,
    pub(crate) table: RawTable<(K, V), A>,
}

pub struct RawTable<T, A: Allocator + Clone = Global> {
    table: RawTableInner<A>,

    // Tell dropck that we own instances of T.
    marker: PhantomData<T>,
}

struct RawTableInner<A> {
    bucket_mask: usize,

    // [Padding], T1, T2, ..., Tlast, C1, C2, ...
    //                                ^ points here
    // 指向哈希表堆内存末端的 ctrl 区
    ctrl: NonNull<u8>,

    // 哈希表在下次自动增长前还能存储多少数据
    // 随着哈希表不断插入数据,它会以 2 的幂减一的方式增长
    growth_left: usize,

    // 哈希表现在有多少数据
    items: usize,
    alloc: A,
}
}
自定义数据结构做 Hash key
use std::{
    collections::{hash_map::DefaultHasher, HashMap},
    hash::{Hash, Hasher},
};

// 如果要支持 Hash,可以用 #[derive(Hash)],前提是每个字段都实现了 Hash
// 如果要能作为 HashMap 的 key,还需要 PartialEq 和 Eq
#[derive(Debug, Hash, PartialEq, Eq)]
struct Student<'a> {
    name: &'a str,
    age: u8,
}

impl<'a> Student<'a> {
    pub fn new(name: &'a str, age: u8) -> Self {
        Self { name, age }
    }
}

fn main() {
    let mut hasher = DefaultHasher::new();
    let student = Student::new("Tyr", 18);
    // 实现了 Hash 的数据结构可以直接调用 hash 方法
    student.hash(&mut hasher);
    let mut map = HashMap::new();
    // 实现了 Hash / PartialEq / Eq 的数据结构可以作为 HashMap 的 key
    map.insert(student, vec!["Math", "Writing"]);
    println!("hash: 0x{:x}, map: {:?}", hasher.finish(), map);
}
BTreeMap
BTreeMap 是内部使用 B-tree 来组织哈希表的数据结构,和 HashMap 不同的是,BTreeMap 是有序的。
use std::collections::BTreeMap;

fn main() {
    let map = BTreeMap::new();
    let mut map = explain("empty", map);

    for i in 0..16usize {
        map.insert(format!("Tyr {}", i), i);
    }

    let mut map = explain("added", map);

    map.remove("Tyr 1");

    let map = explain("remove 1", map);

    for item in map.iter() {
        println!("{:?}", item);
    }
}

// BTreeMap 结构有 height,node 和 length
// 我们 transmute 打印之后,再 transmute 回去
fn explain<K, V>(name: &str, map: BTreeMap<K, V>) -> BTreeMap<K, V> {
    let arr: [usize; 3] = unsafe { std::mem::transmute(map) };
    println!(
        "{}: height: {}, root node: 0x{:x}, len: 0x{:x}",
        name, arr[0], arr[1], arr[2]
    );
    unsafe { std::mem::transmute(arr) }
}
如果想自定义的数据结构可以作为 BTreeMap 的 key,那么需要实现 PartialOrd 和 Ord。
use std::collections::BTreeMap;

#[derive(Debug, PartialOrd, Ord, PartialEq, Eq)]
struct Name {
    pub name: String,
    pub flags: u32,
}

impl Name {
    pub fn new(name: impl AsRef<str>, flags: u32) -> Self {
        Self {
            name: name.as_ref().to_string(),
            flags,
        }
    }
}

fn main() {
    let mut map = BTreeMap::new();
    map.insert(Name::new("/etc/password", 0x1), 12);
    map.insert(Name::new("/etc/hosts", 0x1), 4);
    map.insert(Name::new("/home/tchen", 0x0), 28);

    for item in map.iter() {
        println!("{:?}", item);
    }
}
错误处理
? 操作符
? 操作符内部被展开成类似这样的代码:
#![allow(unused)]
fn main() {
match result {
    Ok(v) => v,
    Err(e) => return Err(e.into())
}
}
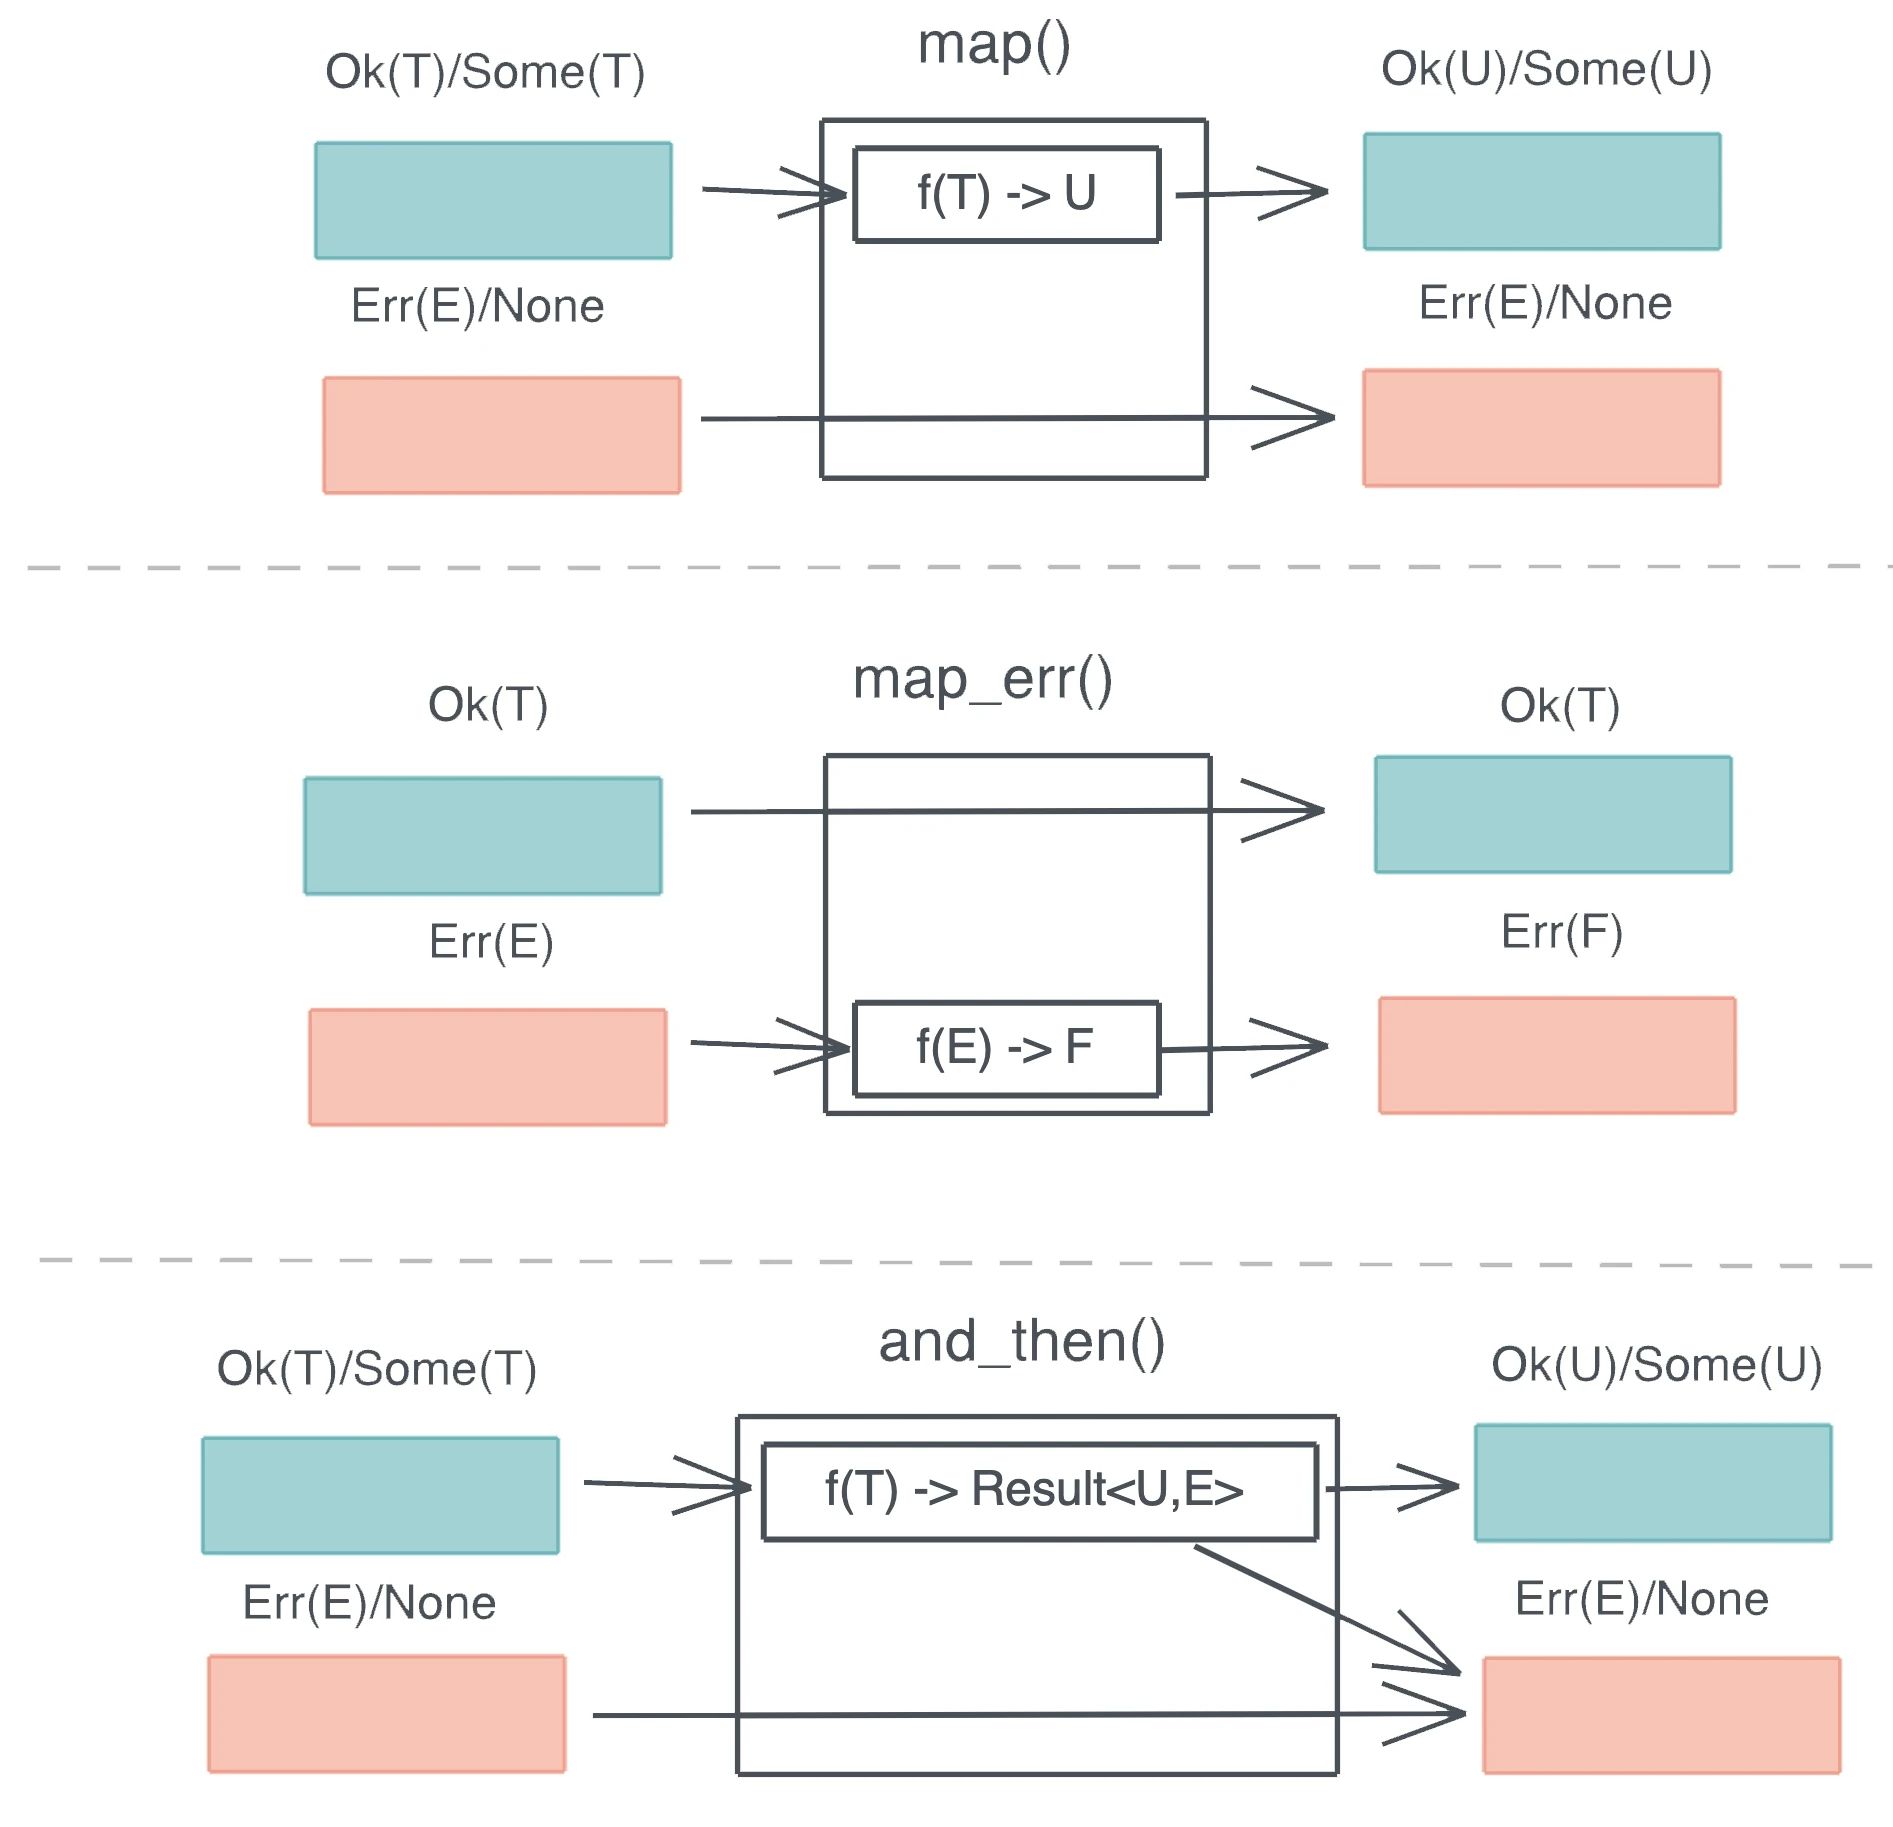
函数式错误处理
cache_unwind
Rust 标准库提供了catch_unwind()函数,能够像异常处理那样将调用栈回溯到 catch_unwind 这一刻,作用和其它语言的 try {…} catch {…} 一样。
use std::panic;

fn main() {
    let result = panic::catch_unwind(|| {
        println!("hello!");
    });
    assert!(result.is_ok());
    let result = panic::catch_unwind(|| {
        panic!("oh no!");
    });
    assert!(result.is_err());
    println!("panic captured: {:#?}", result);
}
Error trait
为了规范代表错误的数据类型的行为,Rust 定义了 Error trait:
#![allow(unused)]
fn main() {
pub trait Error: Debug + Display {
    fn source(&self) -> Option<&(dyn Error + 'static)> { ... }
    fn backtrace(&self) -> Option<&Backtrace> { ... }
    fn description(&self) -> &str { ... }
    fn cause(&self) -> Option<&dyn Error> { ... }
}
}
thiserror 可以帮助简化错误类型的定义。
#![allow(unused)]
fn main() {
use thiserror::Error;
#[derive(Error, Debug)]
#[non_exhaustive]
pub enum DataStoreError {
    #[error("data store disconnected")]
    Disconnect(#[from] io::Error),
    #[error("the data for key `{0}` is not available")]
    Redaction(String),
    #[error("invalid header (expected {expected:?}, found {found:?})")]
    InvalidHeader {
        expected: String,
        found: String,
    },
    #[error("unknown data store error")]
    Unknown,
}
}
anyhow 实现了 anyhow::Error 和任意符合 Error trait 的错误类型之间的转换,让你可以使用 ? 操作符,不必再手工转换错误类型。
闭包
闭包是一种匿名类型,一旦声明,就会产生一个新的类型,但这个类型无法被其它地方使用。这个类型就像一个结构体,会包含所有捕获的变量。闭包是存储在栈上,并且除了捕获的数据外,闭包本身不包含任何额外函数指针指向闭包的代码。
#![allow(unused)]
fn main() {
use std::{collections::HashMap, mem::size_of_val};

// 长度为 0
let c1 = || println!("hello world!");
// 和参数无关,长度也为 0
let c2 = |i: i32| println!("hello: {}", i);
let name = String::from("tyr");
let name1 = name.clone();
let mut table = HashMap::new();
table.insert("hello", "world");
// 如果捕获一个引用,长度为 8
let c3 = || println!("hello: {}", name);
// 捕获移动的数据 name1(长度 24) + table(长度 48),因此 closure 长度 72
let c4 = move || println!("hello: {}, {:?}", name1, table);
let name2 = name.clone();
// 和局部变量无关,捕获了一个 String name2,因此 closure 长度 24
let c5 = move || {
    let x = 1;
    let name3 = String::from("lindsey");
    println!("hello: {}, {:?}, {:?}", x, name2, name3);
};

println!(
    "c1: {}, c2: {}, c3: {}, c4: {}, c5: {}, main: {}",
    size_of_val(&c1),
    size_of_val(&c2),
    size_of_val(&c3),
    size_of_val(&c4),
    size_of_val(&c5),
    size_of_val(&main),
);
}
不带 move 时,闭包捕获的是对应自由变量的引用;带 move 时,对应自由变量的所有权会被移动到闭包结构中。
闭包的类型
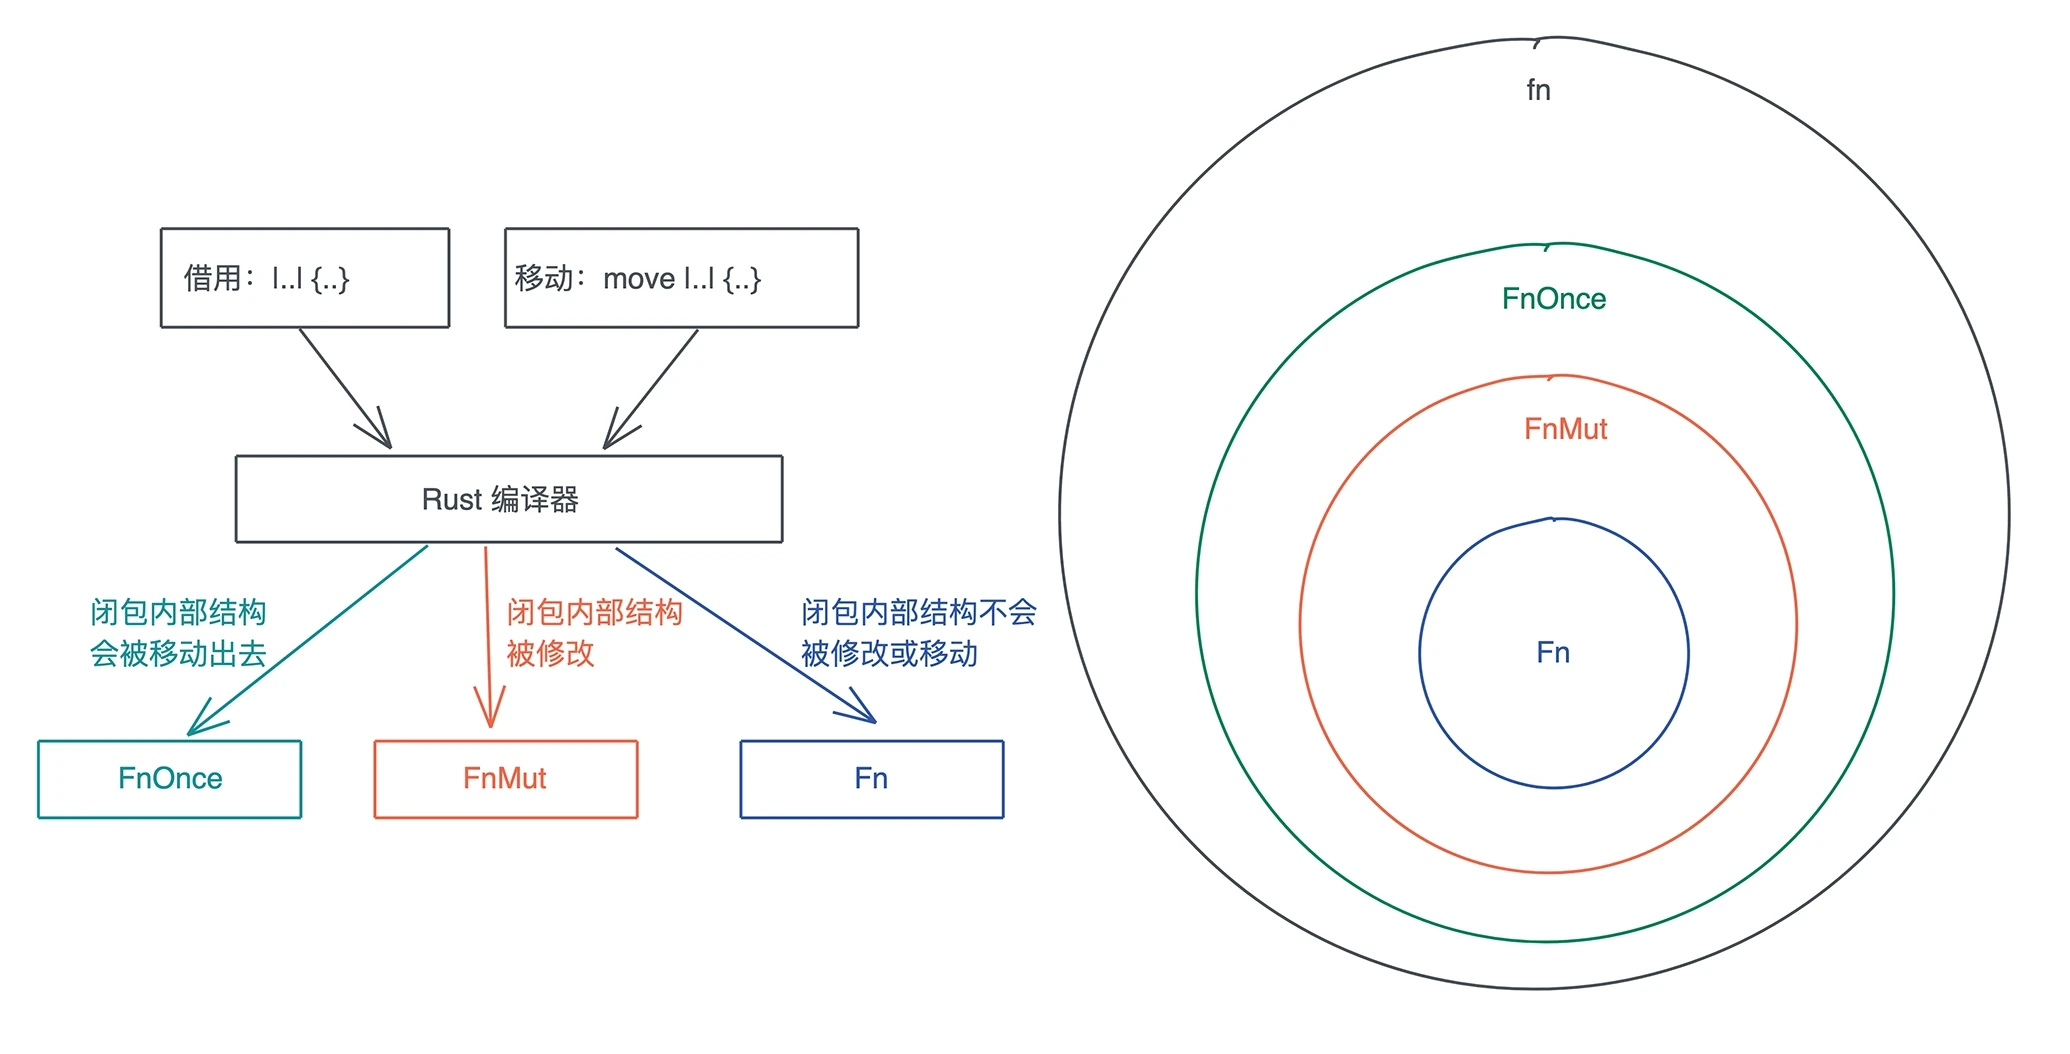
#![allow(unused)]
fn main() {
pub trait FnOnce<Args> {
    type Output;
    // 会转移 self 的所有权到 call_once 函数中
    extern "rust-call" fn call_once(self, args: Args) -> Self::Output;
}
}
#![allow(unused)]
fn main() {
// 一个 FnMut 闭包,可以被传给一个需要 FnOnce 的上下文,此时调用闭包相当于调用了 call_once()
pub trait FnMut<Args>: FnOnce<Args> {
    extern "rust-call" fn call_mut(
        &mut self,
        args: Args
    ) -> Self::Output;
}
}
#![allow(unused)]
fn main() {
// 任何需要 FnOnce 或者 FnMut 的场合,都可以传入满足 Fn 的闭包
pub trait Fn<Args>: FnMut<Args> {
    extern "rust-call" fn call(&self, args: Args) -> Self::Output;
}
}
将闭包作为参数传递
fn main() {
    let v = vec![0u8; 1024];
    let v1 = vec![0u8; 1023];

    // Fn,不移动所有权
    let mut c = |x: u64| v.len() as u64 * x;
    // Fn,移动所有权
    let mut c1 = move |x: u64| v1.len() as u64 * x;

    println!("direct call: {}", c(2));
    println!("direct call: {}", c1(2));

    println!("call: {}", call(3, &c));
    println!("call: {}", call(3, &c1));

    println!("call_mut: {}", call_mut(4, &mut c));
    println!("call_mut: {}", call_mut(4, &mut c1));

    println!("call_once: {}", call_once(5, c));
    println!("call_once: {}", call_once(5, c1));
}

fn call(arg: u64, c: &impl Fn(u64) -> u64) -> u64 {
    c(arg)
}

fn call_mut(arg: u64, c: &mut impl FnMut(u64) -> u64) -> u64 {
    c(arg)
}

fn call_once(arg: u64, c: impl FnOnce(u64) -> u64) -> u64 {
    c(arg)
}
返回闭包
use std::ops::Mul;

fn main() {
    let c1 = curry(5);
    println!("5 multiply 2 is: {}", c1(2));

    let adder2 = curry(3.14);
    println!("pi multiply 4^2 is: {}", adder2(4. * 4.));
}

fn curry<T>(x: T) -> impl Fn(T) -> T
where
    T: Mul<Output = T> + Copy,
{
    move |y| x * y
}
给闭包实现其他 trait
有些接口既可以传入一个结构体,又可以传入一个函数或者闭包。
pub trait Executor {
    fn execute(&self, cmd: &str) -> Result<String, &'static str>;
}

struct BashExecutor {
    env: String,
}

impl Executor for BashExecutor {
    fn execute(&self, cmd: &str) -> Result<String, &'static str> {
        Ok(format!(
            "fake bash execute: env: {}, cmd: {}",
            self.env, cmd
        ))
    }
}

impl<T> Executor for T
where
    T: Fn(&str) -> Result<String, &'static str>,
{
    fn execute(&self, cmd: &str) -> Result<String, &'static str> {
        self(cmd)
    }
}

fn main() {
    let env = "PATH=/usr/bin".to_string();

    let cmd = "cat /etc/passwd";
    let r1 = execute(cmd, BashExecutor { env: env.clone() });
    println!("{:?}", r1);

    let r2 = execute(cmd, |cmd: &str| {
        Ok(format!("fake fish execute: env: {}, cmd: {}", env, cmd))
    });
    println!("{:?}", r2);
}

fn execute(cmd: &str, exec: impl Executor) -> Result<String, &'static str> {
    exec.execute(cmd)
}